The Elden Ring DLC recently released and as expected it is incredibly good. The map design, the new lore, the creativity of the regular enemies and bosses. However, for as beautiful as these designs are, many people had a rude awakening when they actually began fighting them. “The DLC is hard” is an understatement, and fans were so frustrated the Steam review score went down to Mixed for a while with complaints of difficulty. So as an avid fan of this game myself i want to share tips about how to survive the DLC, tips i used myself to beat it on NG+8! Keep in mind these are base game options for those who struggle, but it is worth to say within the Realm of Shadow there are more powerful options than those mentioned here.
Scadutree Fragments
Think of them as the new level up!
I feel this goes without saying but i will mention it just in case, as it is probably the most important mechanic of the DLC. By collecting Scadutree Fragments and using them at any Site of Grace in the DLC map to increase your Shadow Realm Blessing, you are both raising the damage you deal AND lowering the damage you take in the DLC area. Fromsoft couldn’t be clearer, if you struggle at a boss, leave. And explore, find Fragments, and come back stronger. Like Margit and Tree Sentinel at the very start of the main game, you’re meant to return later. You can raise the Blessing up to 20.
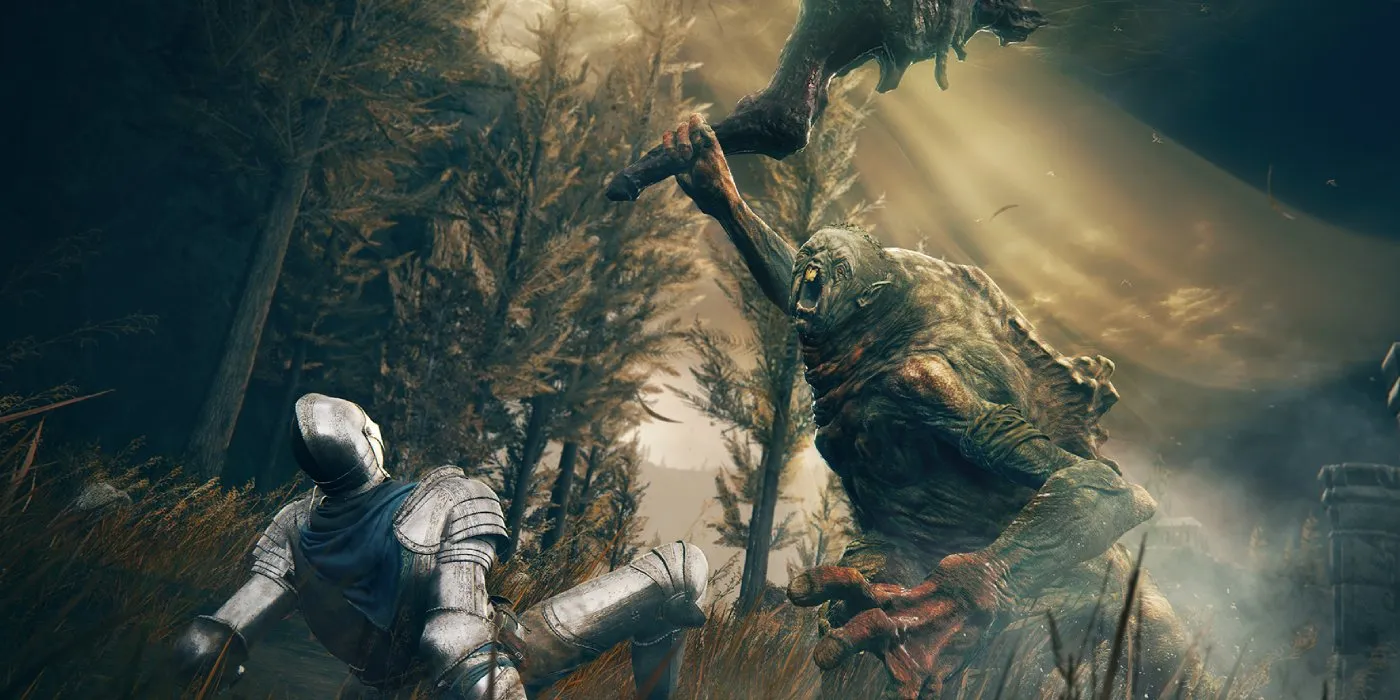
In this image my Blessing is at 11 and these are the stats compared between being naked in the main game, and being naked in the Shadow Realm. That’s a whopping 35% damage reduction across the board, and 150% damage increase. The Bull-Goat set, highest physical defence armour in the main game, has a combined 38% physical damage reduction for comparison.
You can find Scadutree Fragments in the unlikeliest of places. (Minor spoiler ahead - skip to next section to avoid). For example there is a small cemetery right east next to the Scorched Ruins, less than a minute walk from where you start the DLC. There among the shadow villagers you will see one with a huge pot on his head that will run away and vanish like the Teardrop Scarabs.If you kill him before he vanishes, he drops a Fragment.
Defence and Armor
Armor isn’t enough!
Like in most games the more defence measures you take the less effective they become. This is known as diminishing returns. You will never be able to reach 100% damage negation on your character but you can get close to it! Each enemy will also deal different types of damage so no one buff or armour will be good against everyone. Every character has a flat defence and a percentage defence. The flat defence is determined by your stats (your overall Rune Level and Strength value) alone, you can’t alter it except levelling up, so don’t worry about it. Flat means you take that much less damage from that type of damage. Percentage (Negation in game) means you take X% less damage from the remaining value after flat defence is applied.

The way the game stacks negation is multiplicative. The Boiled Crab consumable gives you 20% physical damage negation. That means that no matter how much defence you have, 20% of what you’d take is reduced. If you are at 0 negation, that means you take 100% damage, and the crab offers you 20% reduction. In game it will show you 20% in your character stats. If you have 40% negation from other sources eating a crab will put you at 52%, it reduces that 60% damage you were still taking by a fifth. If you have nothing but Daedicar’s Woe equipped that makes you take double damage it will show in stats a -100% negation, as in you take 200% damage. The crab reduces 20% of that, and so negation will update to be -60% in stats.
The best way to increase your defences is through buffs. Armour alone is helpful but by far the least you can do. For example, for fire damage, the highest negation you can get is from the Fire Prelate set with a combined 37.4% fire negation. The Flamedrake Talisman +2 offers 20% fire negation. The Flame, Protect Me spell offers you 60% fire negation for 70 seconds. Armour sets are good but again, only a small part of what you can do.
Health
Raise Vigor to the 60 hard cap!
Gaining defence is not the only way to increase your survivability. Health is important as each point of armour increases the value of each point of health and viceversa. Vigor is the stat that decides HP, and as the memes say, raise it to 60.

Graph created by TheDezzi55
Elden Ring uses non linear scaling with soft and hard caps. Each point of Vigor will offer a different amount of HP, getting you more and more per point up to 40 Vigor. Then you get slightly less but from 40 to 60 you still go from 1450 HP to 1900 HP. That’s the sweet spot and my advice, more or less mandatory to survive in the Shadow Realm.
Talismans
Free passive defence!
The simplest defence measure you can take is equipping the correct talisman. You have 4 slots for them, so it should generally be easy to make room for 1 or 2 that aren’t offensive.
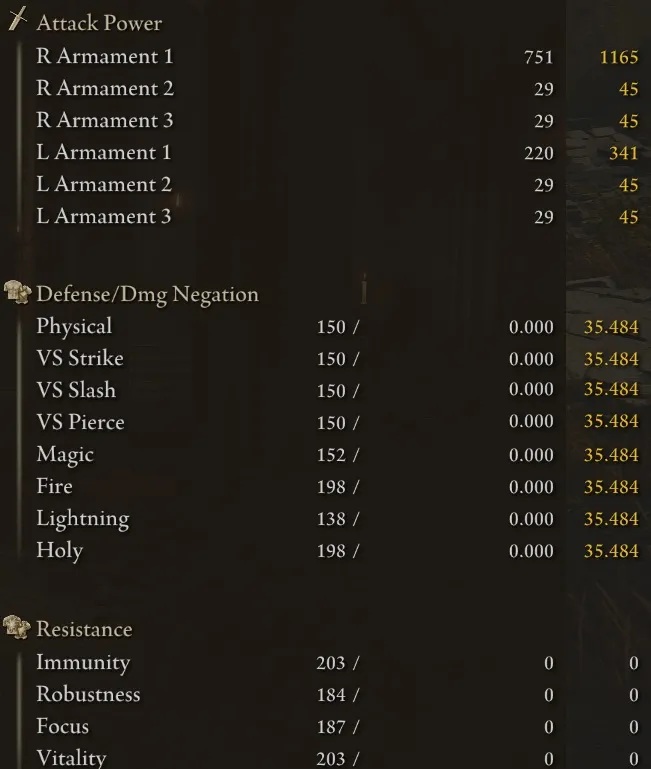
In my opinion the best talisman for surviving high damage bosses is by far the Ritual Shield Talisman. The talisman provides you with 30% negation on all damage if you are at full HP, highest passive negation you can obtain from any one single item. That may seem like a steep requirement but in practice combined with armour, other damage negation buffs and a fully upgraded Flask you will be able to heal that hit you took and be back at full HP. Combine it with Crimson Seed Talisman that increases healing from Flasks by 20% and an HP regen buff, you’ll have no issue maintaining the full HP condition.
The Ritual Shield Talisman can be obtained from a corpse in Leyndell, Royal Capital, lying in front of the coliseum in the south side of the city. The Crimson Seed Talisman can be obtained from Sainted Hero's Grave, in central Altus Plateau, locked behind an imp statue right at the entrance.
For specific damage types we have the various Drake Talismans +0/+1/+2. They provide 13/17/20% negation in their respective damage type depending on the tier of the talisman. Flame for fire, Spell for magic, Lightning for, well lightning, you get it.
The physical negation version break the rule a bit. The Dragoncrest Shield Talisman +0/+1/+2 gives 10/13/17% physical negation depending on the tier, and the Dragoncrest Greatshield Talisman provides the highest 20% physical negation option. I recommend using the Dragoncrest Greatshield at nearly all times, as any enemy uses physical damage except fringe cases. The Pearldrake Talisman +2 offers 9% negation in all elemental damage types making it half as useful than its cousins. Better equip 2 elemental Drake talismans than use this one, if the boss does split damage.
Stacking Buffs
Only use one of each category!
In Elden Ring you can only have 1 temporary buff applied to each category. These categories are weapon, shield, body, HP regen and aura. If you apply 2 body buffs the first one will be erased and replaced. All food is considered body buffs. Auras are generally spells that would affect allies as well around you. For spells you can utilise the Old Lord's Talisman to increase their duration by 30%. Doesn’t work with ashes of war or consumable buffs sadly. For HP regen spells it will increase the overall healing by making the regen last longer while still ticking at the same rate and power.
Auras - Affects you, summoned cooperators and spirits you called from ashes. Few and far between, this is the only category with little choice on the matter.
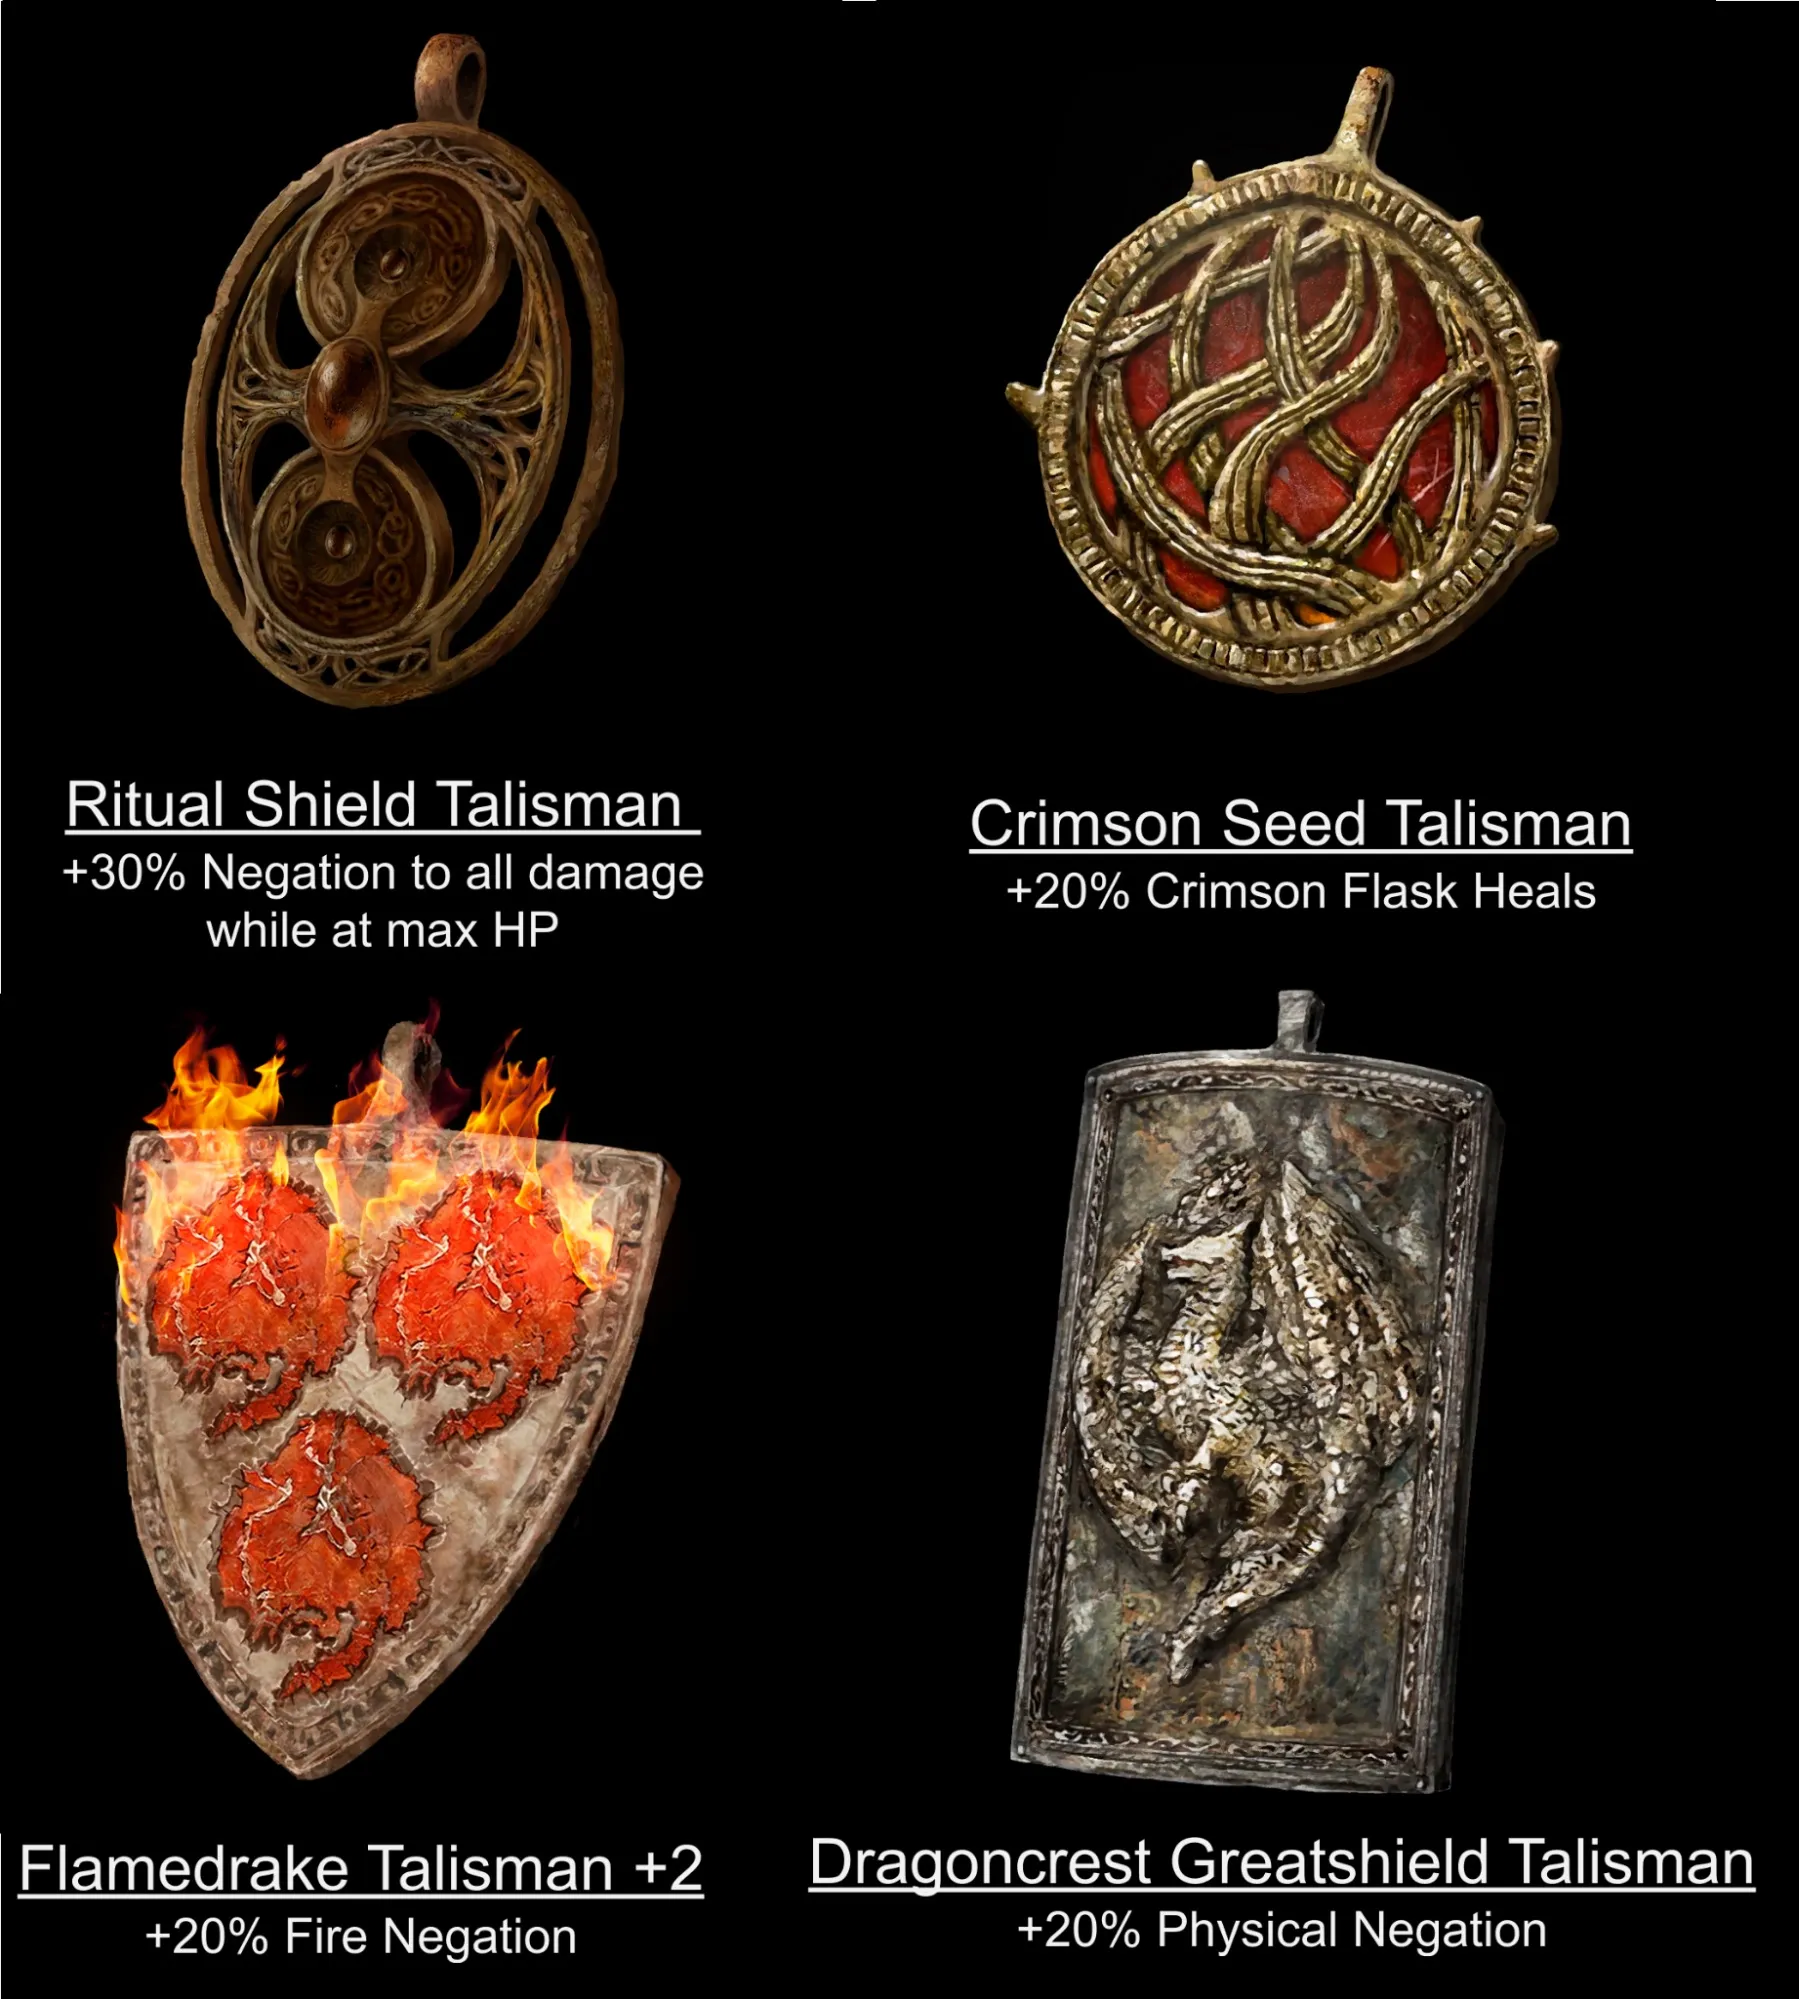
Golden Vow spell is in my opinion by far the best buff in the game and if you struggle in the Shadow Realm, give it a try. It doesn’t require excessive faith and it lasts 80 whole seconds, giving you both offence and defence. The Ash of War version is weak but requires no stat investment to use so you can throw it on a light dagger in your second weapon slot and quickly swap and buff before and during the fight. If you want to try a new weapon the Commander’s Standard is a strength scaling halberd that requires no faith investment and has an ash of war with a stronger effect than Golden Vow, but I personally find the 30 second duration too short. You can find the Golden Vow spell at Corpse-Stench Shack, in Mt Gelmir.
Golden Epitaph’s Ash of War is technically not a defensive aura but it is the strongest way to deal with the undead enemy type, so if you find yourself annoyed at the high health of skeletons and getting overwhelmed by them, Golden Epitaph will drastically make your life easier. And trust me, there’s areas full of undead in the DLC. The buff is an aura not a weapon buff, so it will persist even if you unequip the sword and it will apply on any other weapon you use while buffed.
Health Regen - Despite affecting allies near you like an aura these buffs are a category of their own and thus won’t override anything either, except each other.
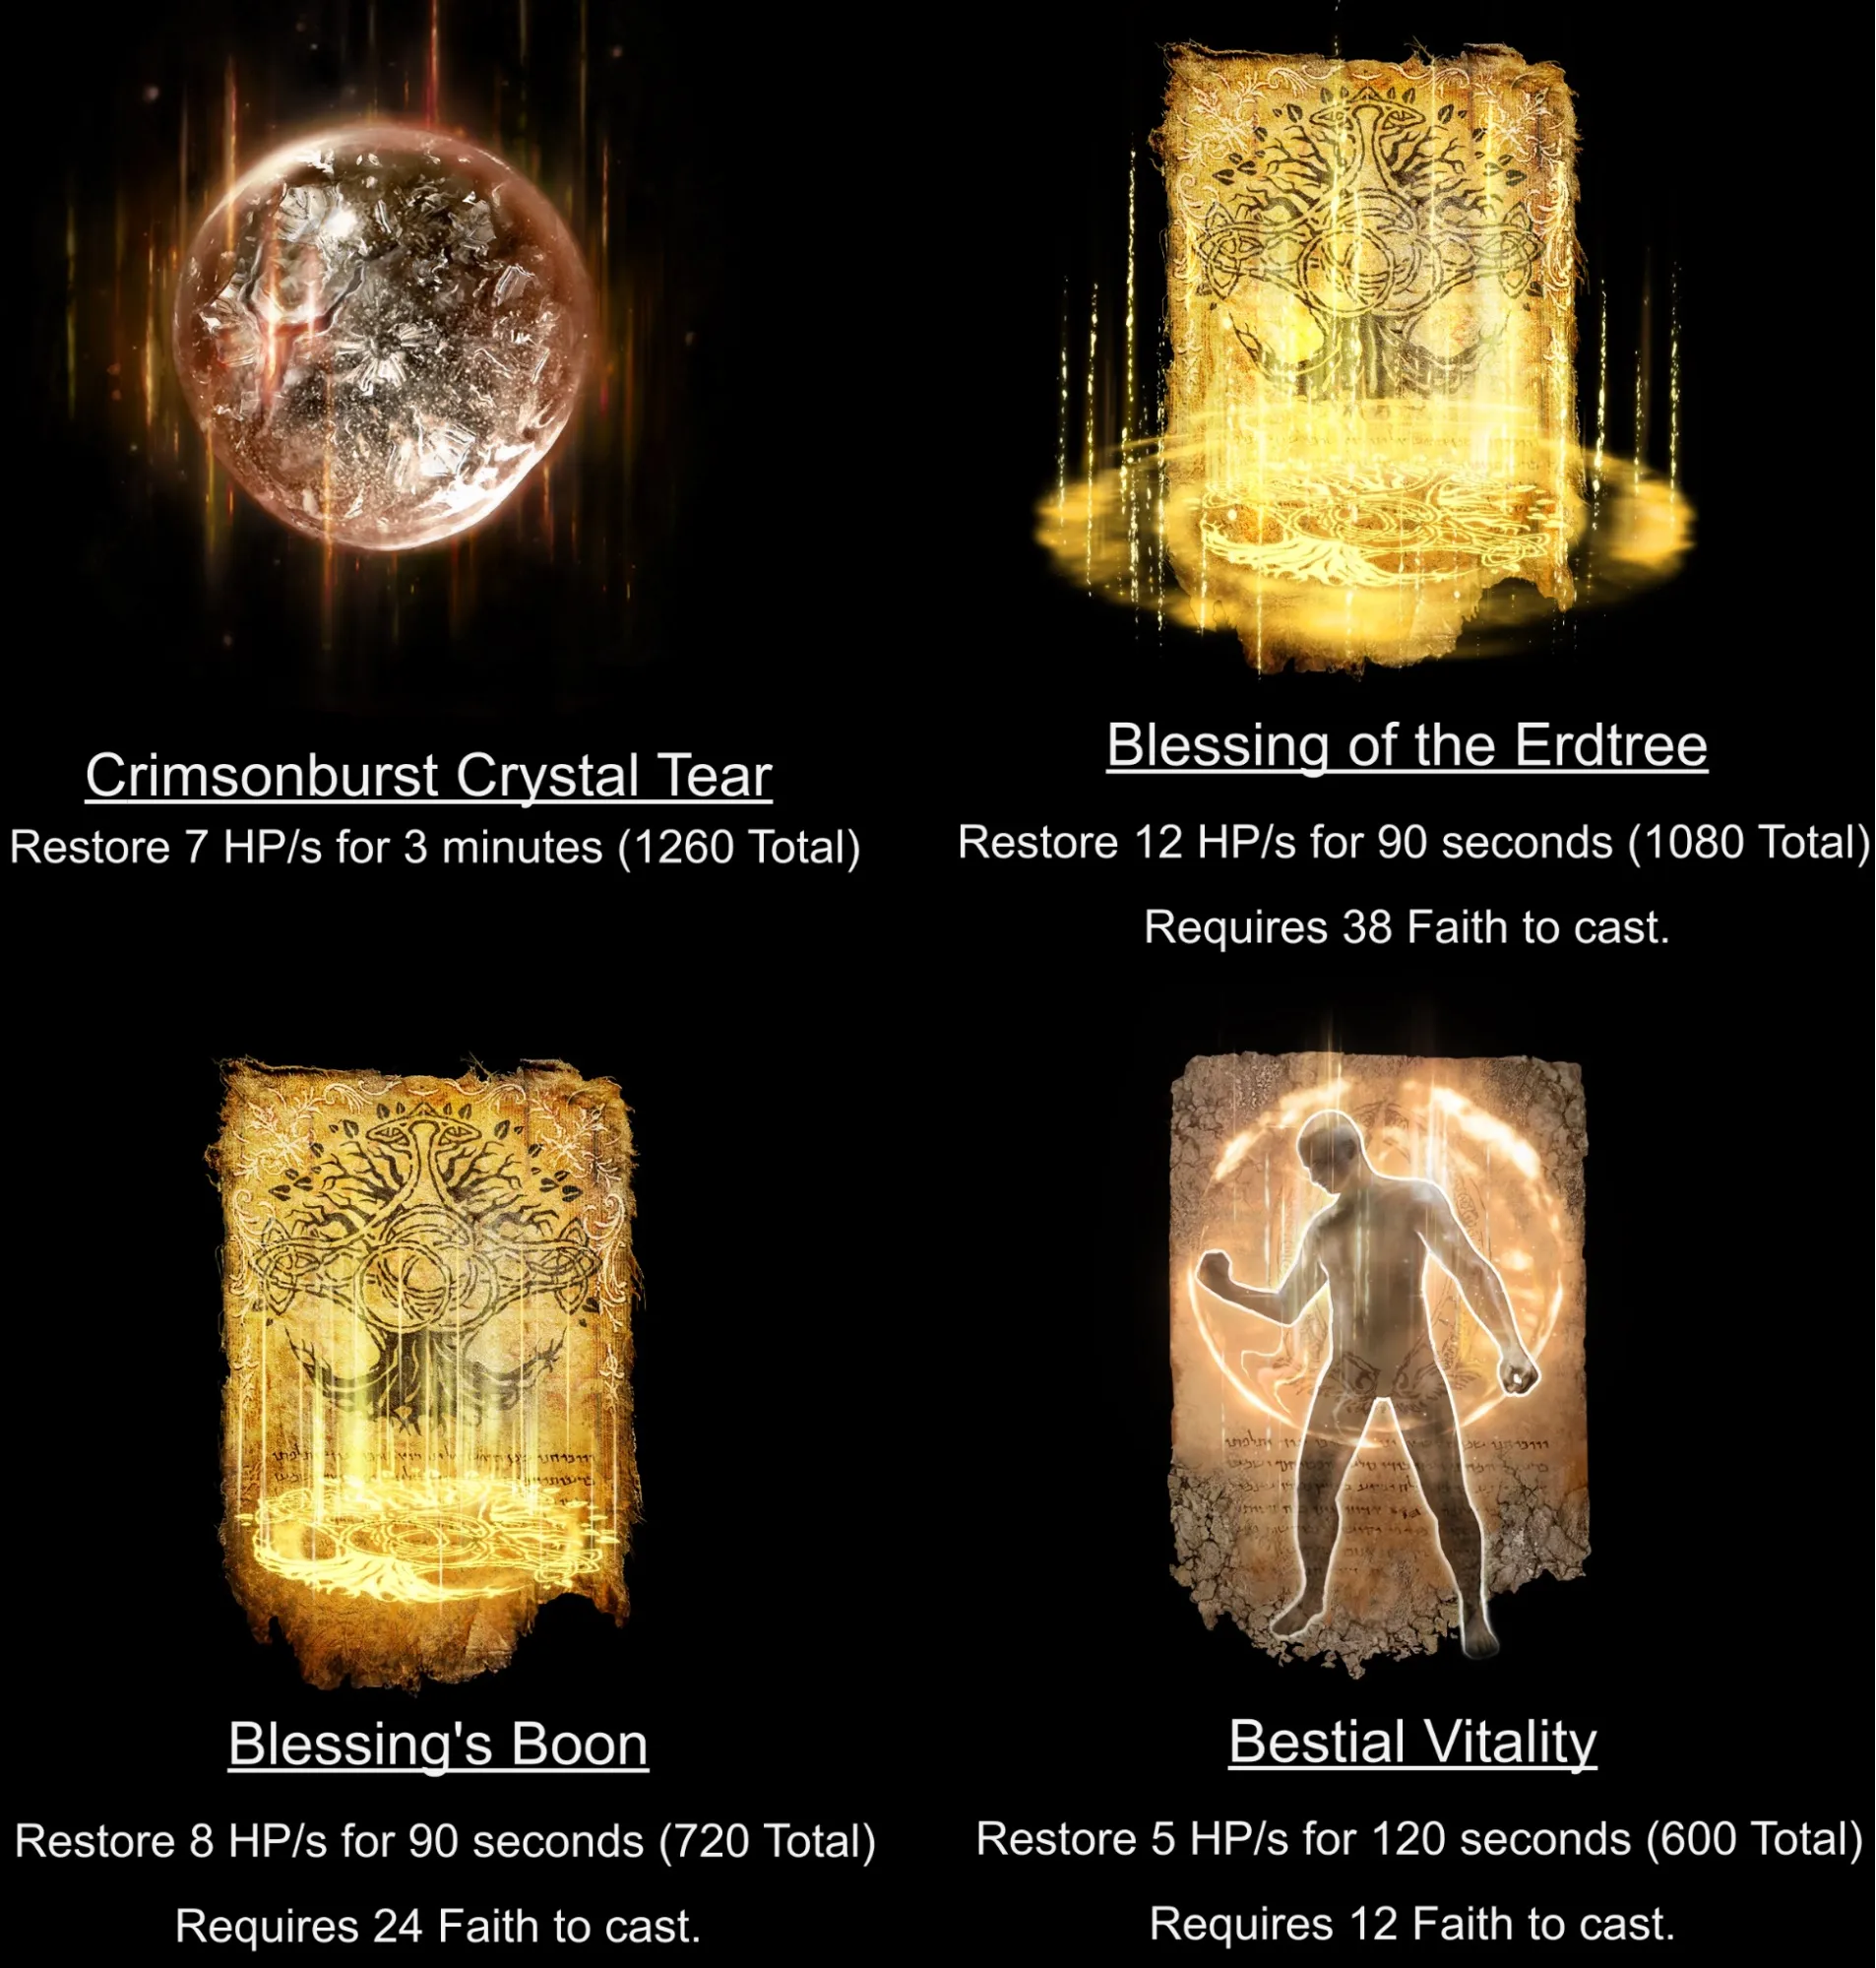
Because these are not interacting with any other buff category, there is really nothing to lose and everything to gain by casting them before entering a boss fight or engaging an enemy group. They pair well with the Ritual Shield Talisman for keeping that max HP requirement. The lowest requirement one, Bestial Vitality, can be used by basically everyone with only a couple levels investment. Gurranq at Bestial Sanctum in Caelid will give it to you after feeding him 3 Deathroots. Blessing's Boon can be purchased from Miriel at Church of Vows in north Liurnia. Blessing of the Erdtree is found at Queen's Bedchamber in Leyndell Royal Capital. Crimsonburst Crystal Tear can be found early on as a drop from the Erdtree Avatar in Weeping Peninsula. Pick how much faith you want to invest and what spell works with you.
Special - These won’t override anything nor will they override each other. The Flask of Wondrous Physick effects in general won’t override anything except the HP regen one which conflicts with other HP regen spells. So use them freely if your resources allow it.
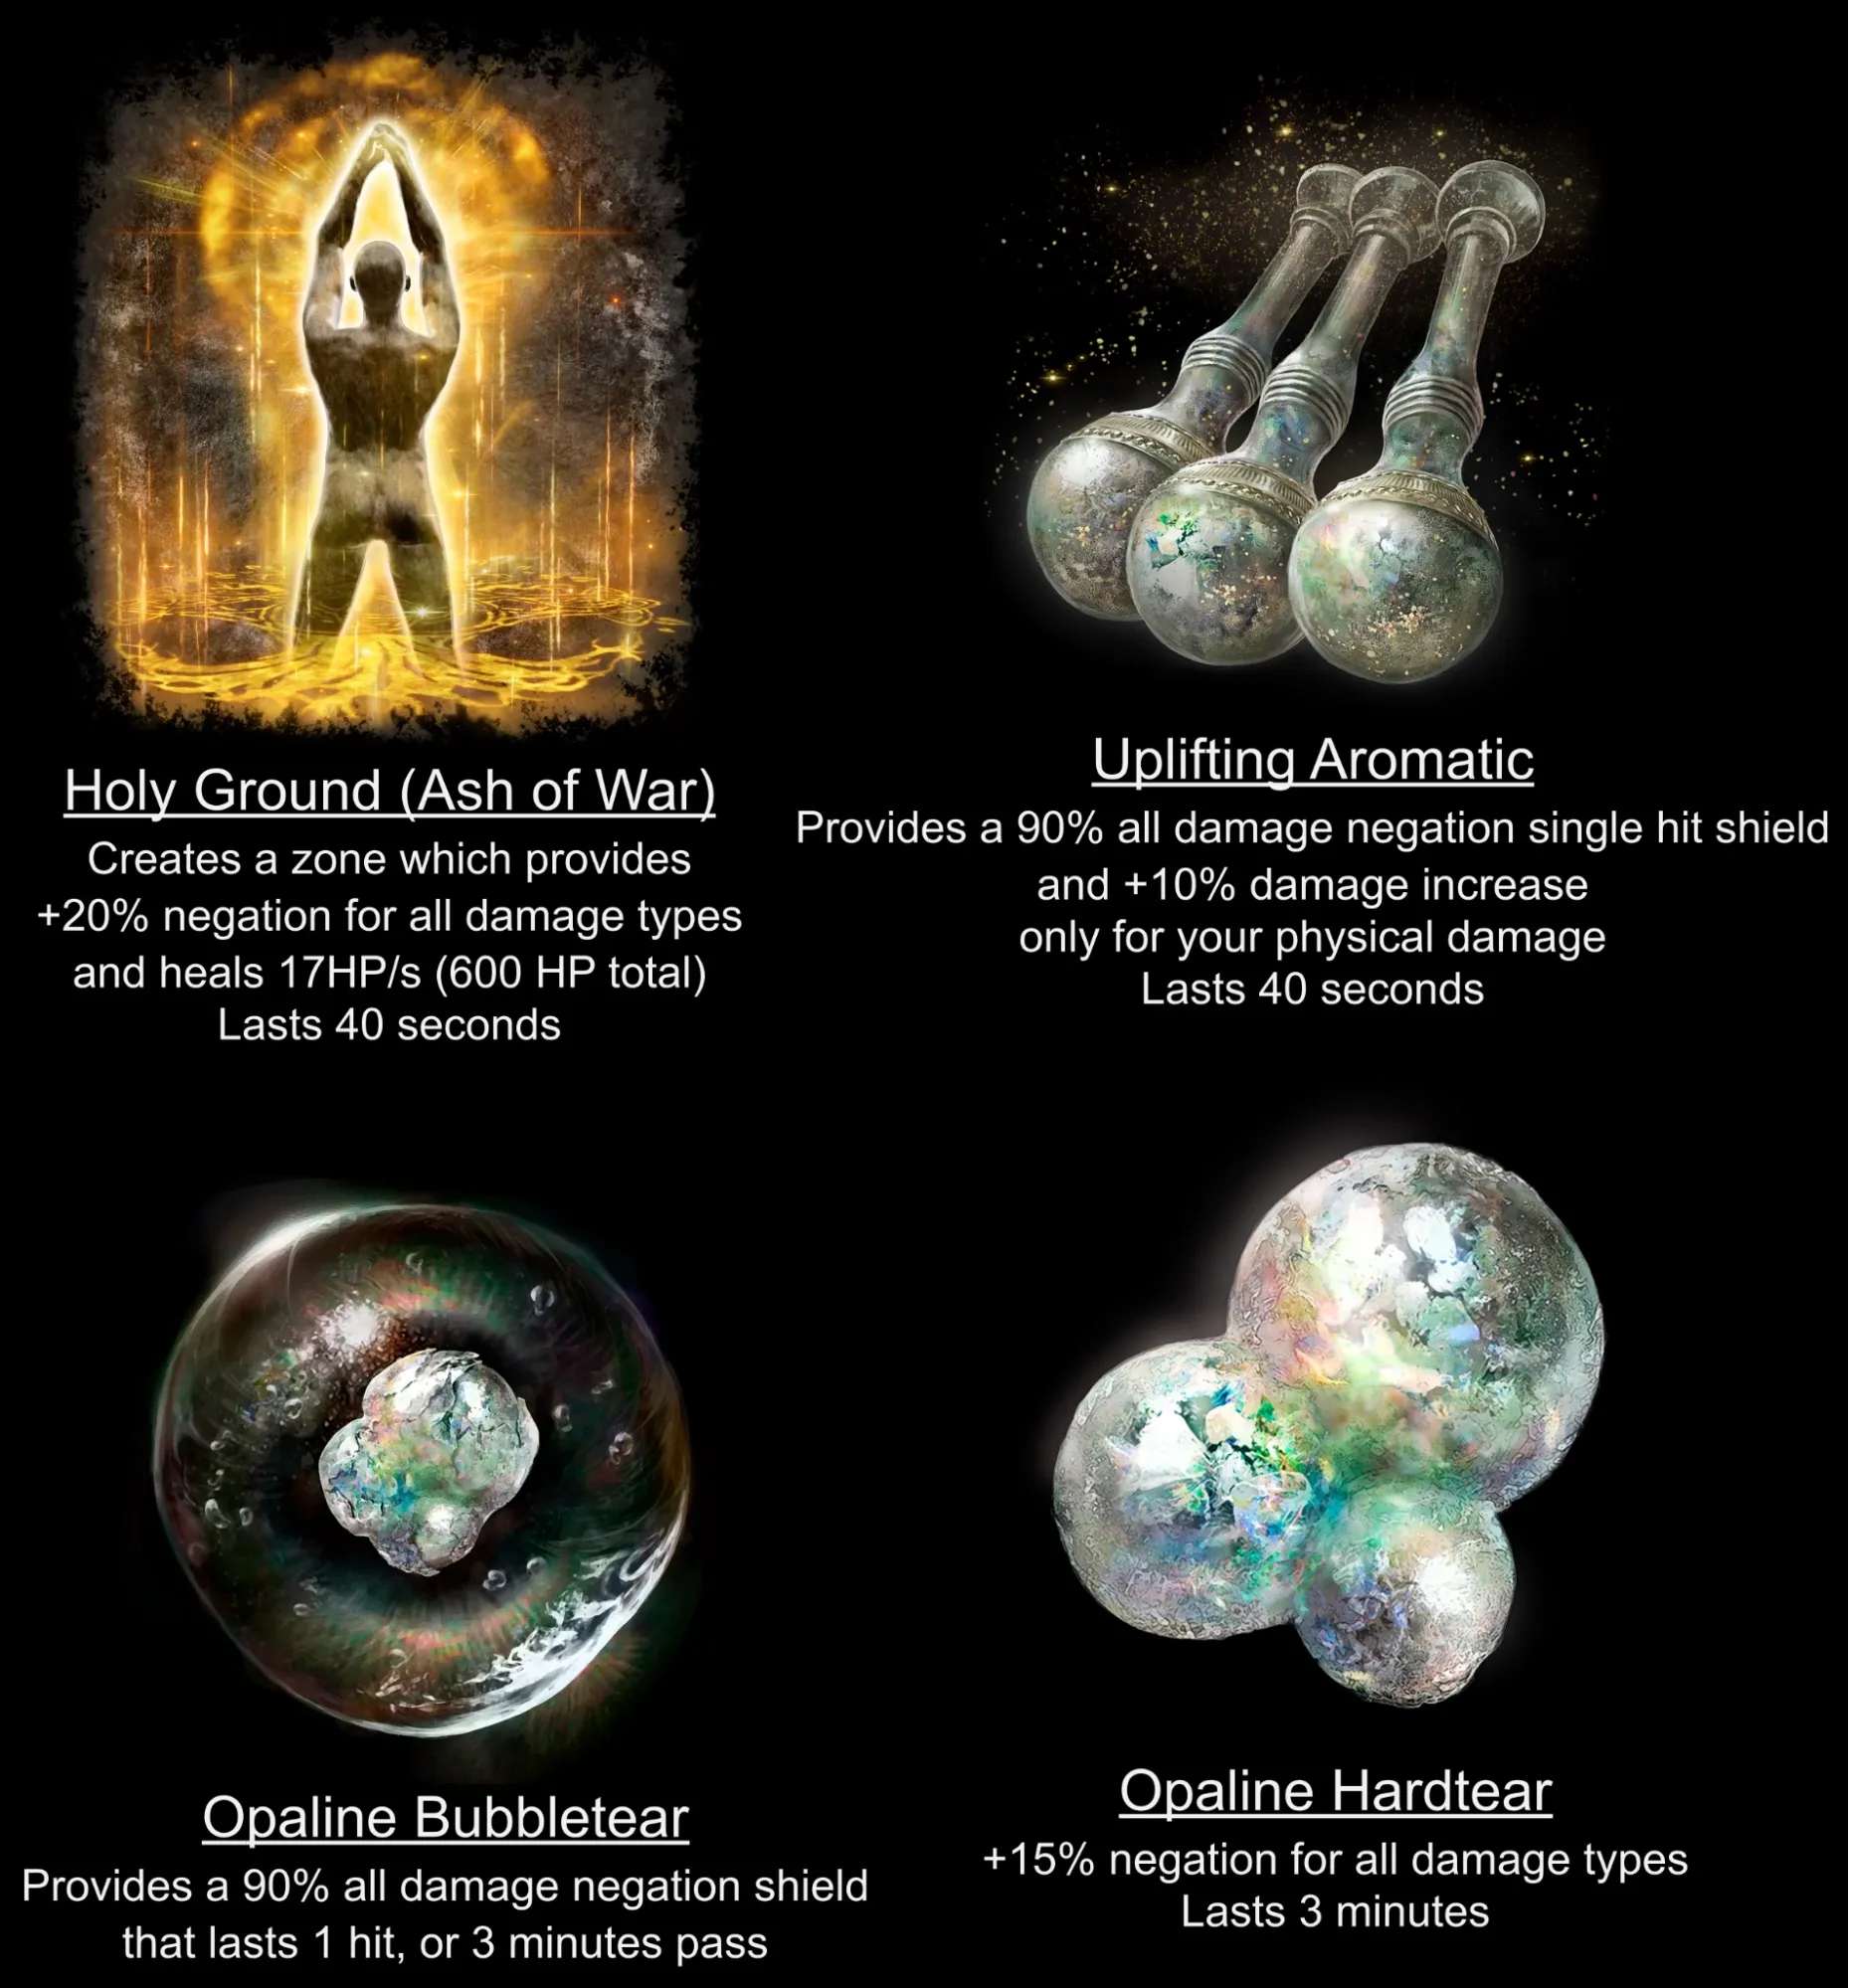
The 2 shields do stack for a near 100% damage reduction on that single hit the shield lasts for.
Uplifting Aromatic is one of the best consumables in the game, however it is equally hard to craft, requiring Arteria Leafs that are limited in number in the world and hard to find. If you use a Mimic Tear summon, it will use equipped items in the quick slots, so you can craft a couple of these and never actually use it yourself. The Mimic will buff you and itself randomly through the battle. Opaline Hardtear is one of the best options if a boss is giving you a hard time. 3 minutes of 15% negation across all damage types is unparalleled. It’s dropped by Putrid Avatar next to the Minor Erdtree north of Fort Faroth in Caelid. Opaline Bubbletear while it sounds enticing I feel is a trap, as other tears are much more valuable. 1 hit and it’s gone while most tears last 3 minutes. Holy Ground in theory is OP but the caveat is the area is small and you rarely can reside in it during the hectic fights of the DLC bosses.

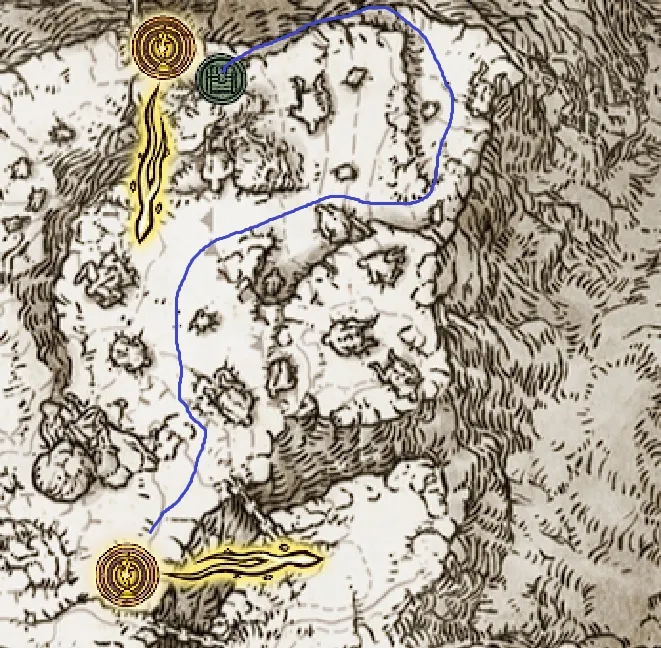
Crimsonwhorl can be one of the strongest options in the game, allowing you to entirely ignore an enemy’s attacks provided they are of the elemental variety. The caveat is that it’s single use per rest and lasts only 15 seconds so you have to really pick your moment. Here’s a map of it’s location, credit to Fextralife. Follow the blue line from the Foot of the Forge Grace.
Crimson Bubbletear will only work if the attack puts you below 20% of your max HP so for low Vigor builds or when the boss has such high damage you die in 1 hit from 50% max HP, this tear is sadly useless to you. This one is dropped by the Erdtree Avatar guarding the Minor Erdtree in the east of the Mountaintops of the Giants.
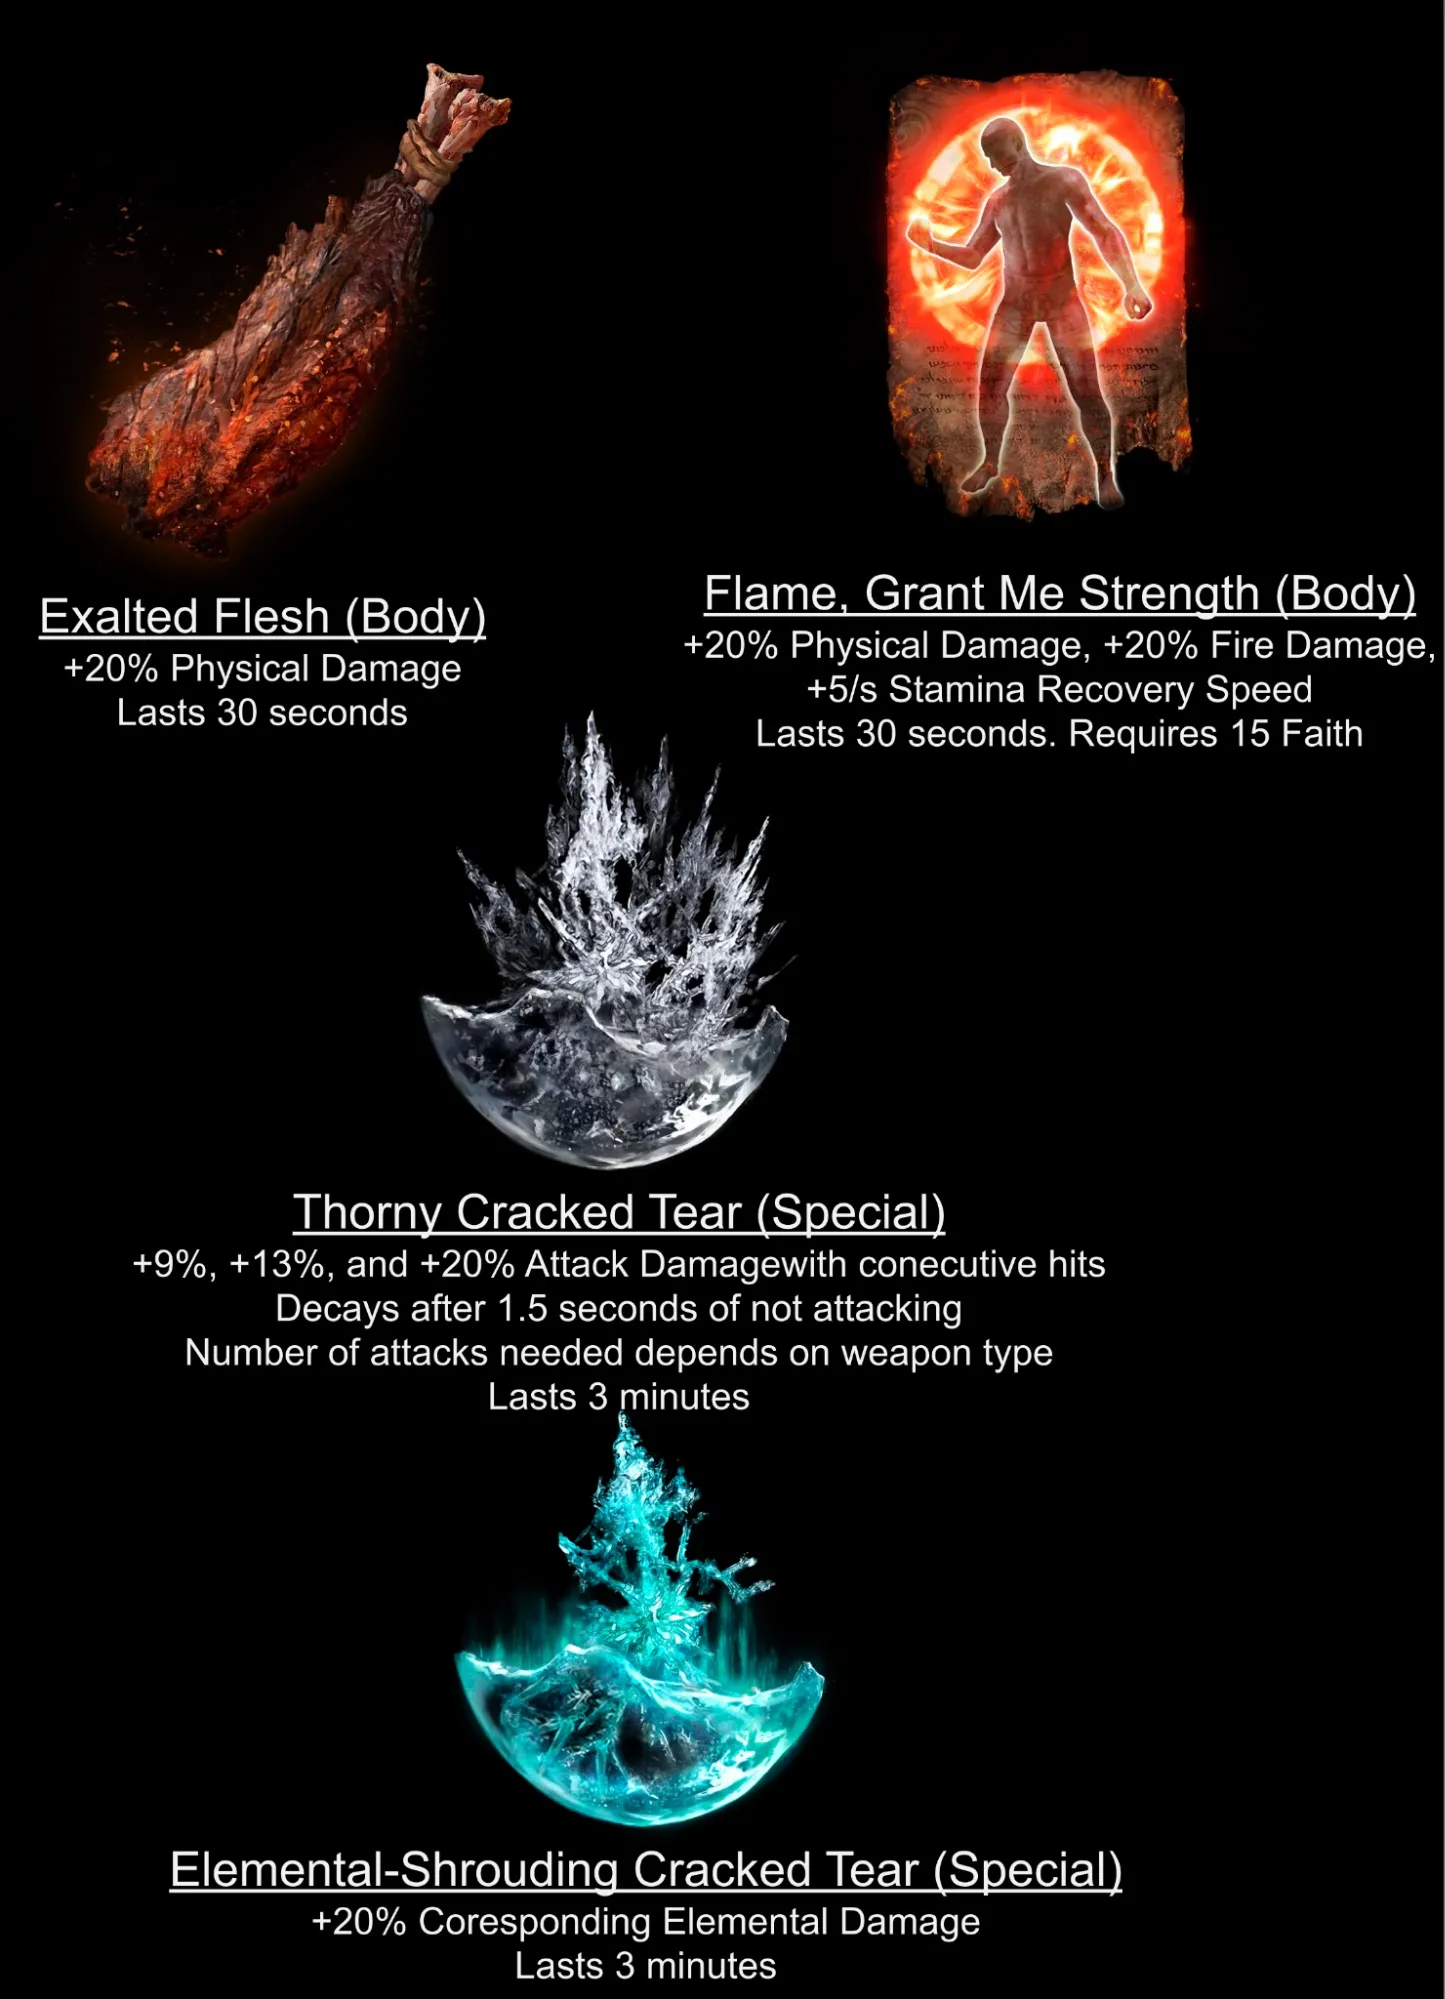
Body Buffs - The main defensive spells. Most food is here as well and they generally act as a weaker, no faith requirement of the body spells, limited by the ingredients needed to craft them.
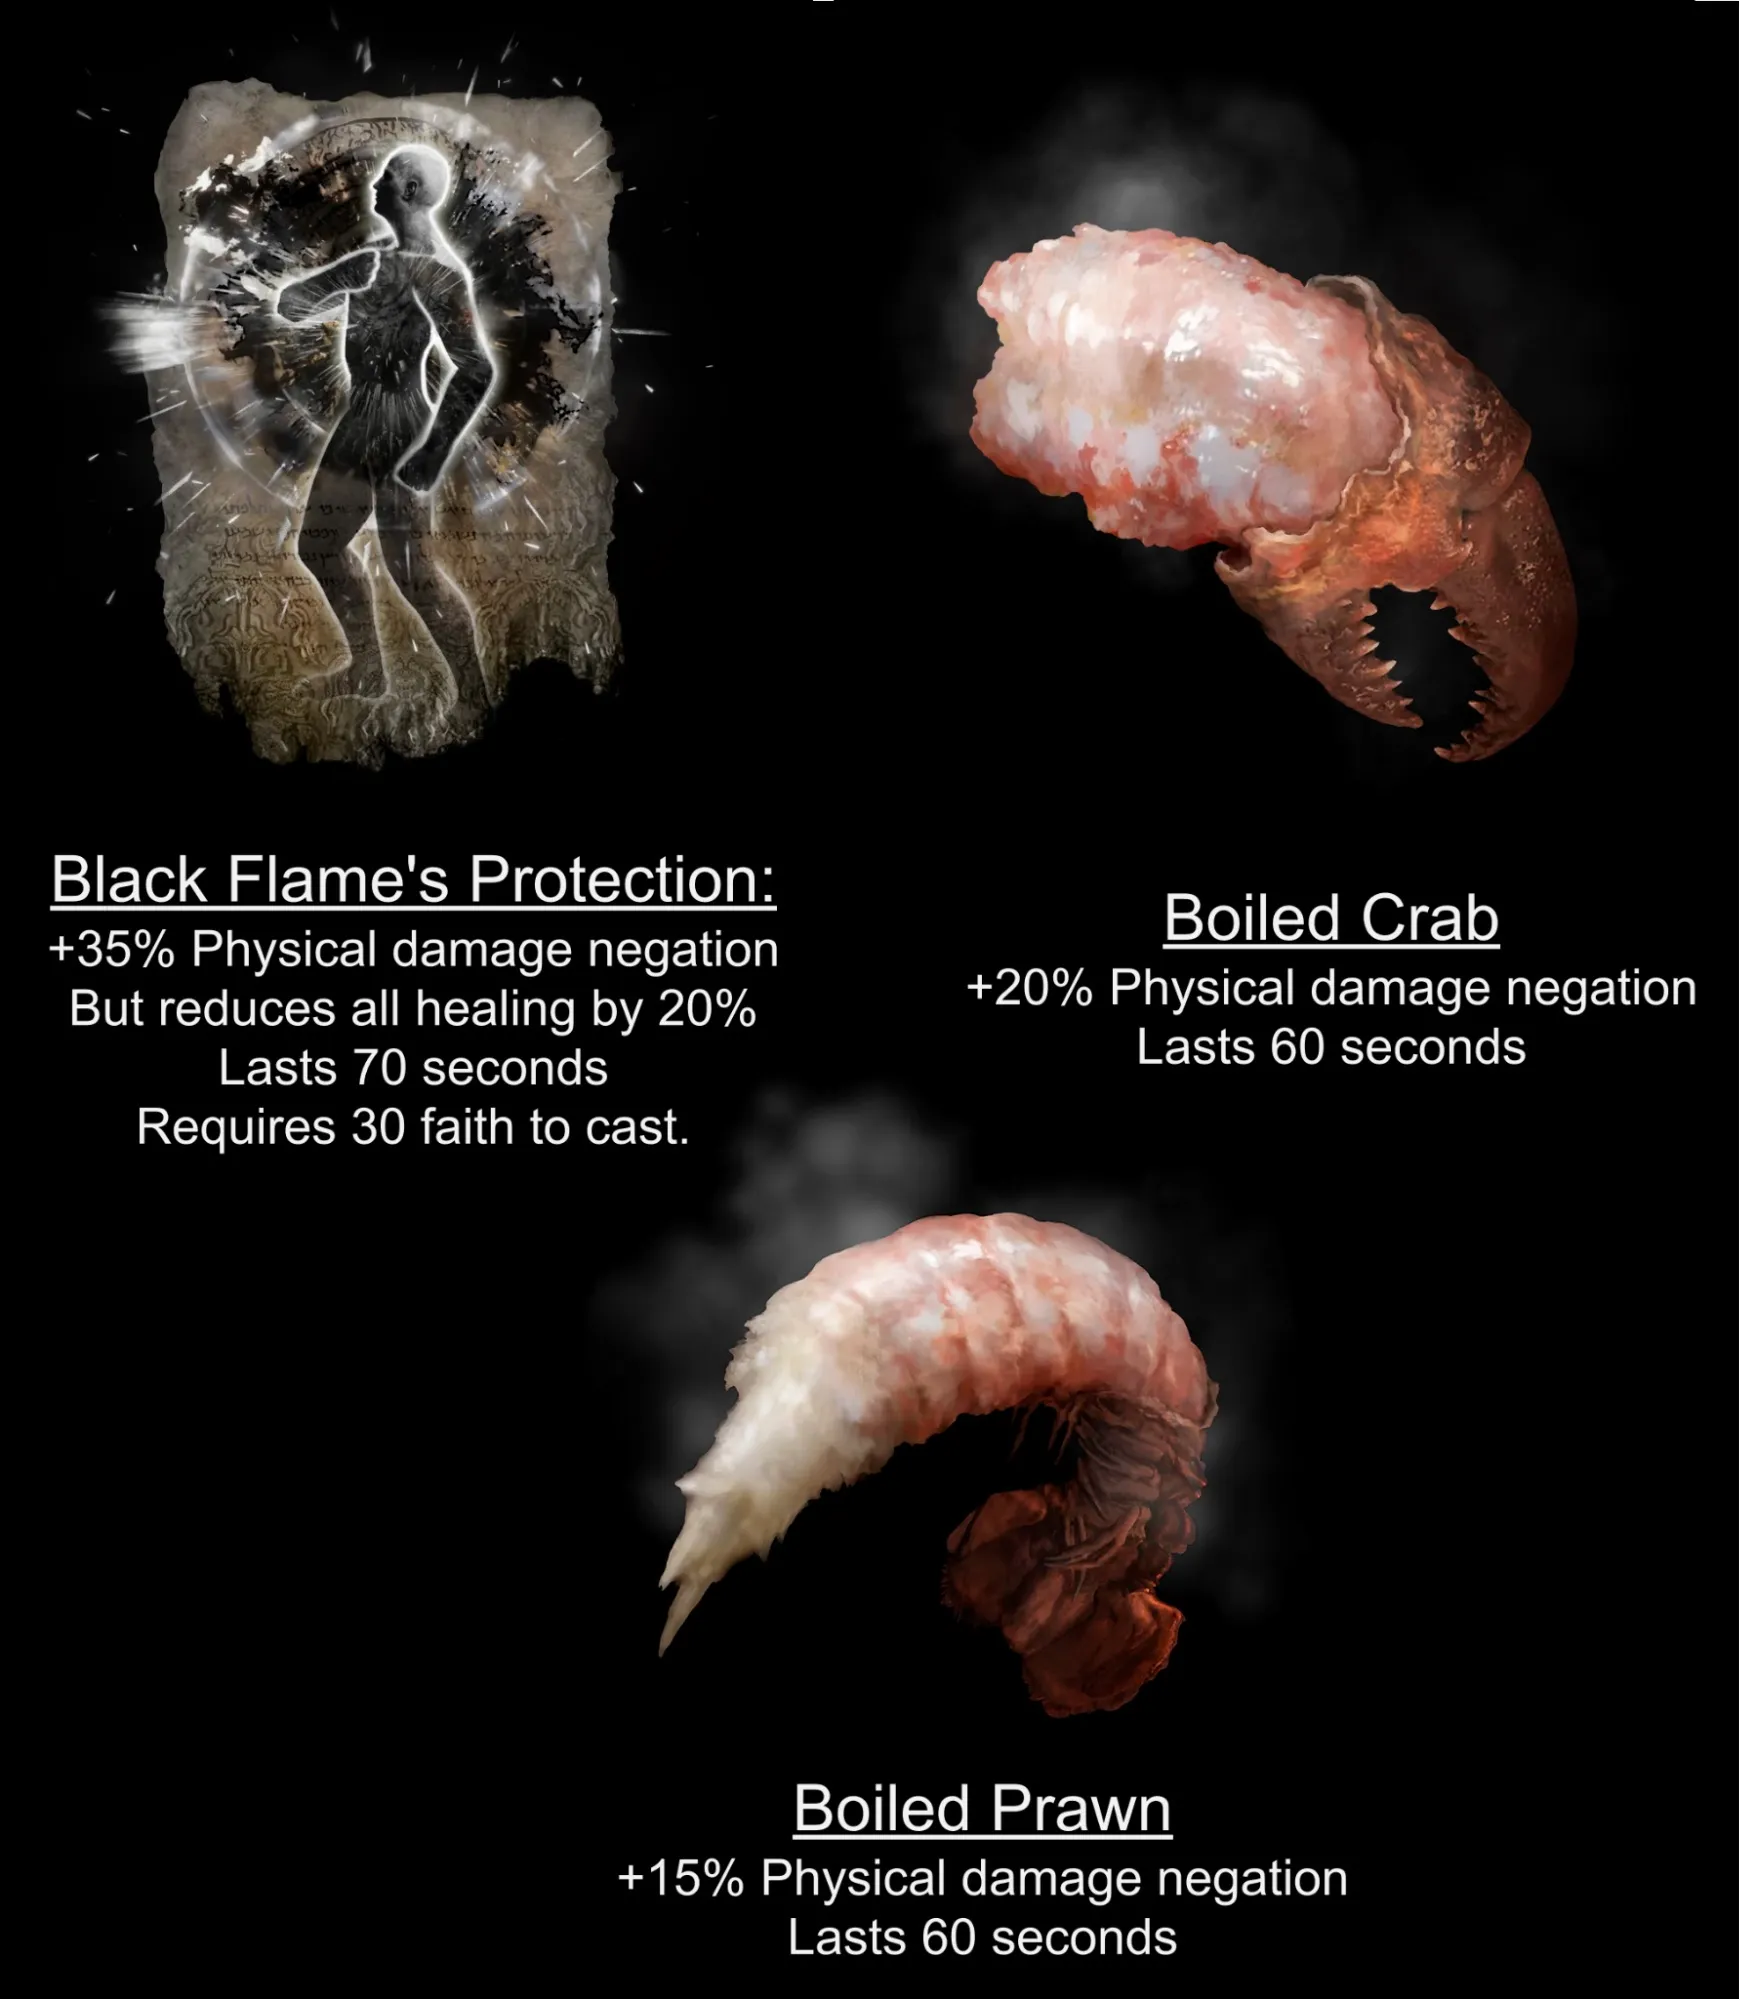
For physical damage, the most common type of damage, this will be your bread and butter. The strongest option in the game is Black Flame's Protection without competition, however the reduction to healing may turn away some players. It can be negated with the Crimson Seed Talisman with it’s +20% increase to flask heals. HP regen spells get affected but with that regen running in the background they help make up for the lost flask heal. You can get Black Flame's Protection from Gideon after you reach the Haligtree or it’s sold at Twin Maiden Husks after you burn the Erdtree.
Alternatively, you can use the 2 boiled seafood items sold by Blackguard Big Boggart. He only sells the crab when he moves to Altus but it’s in unlimited quantities.
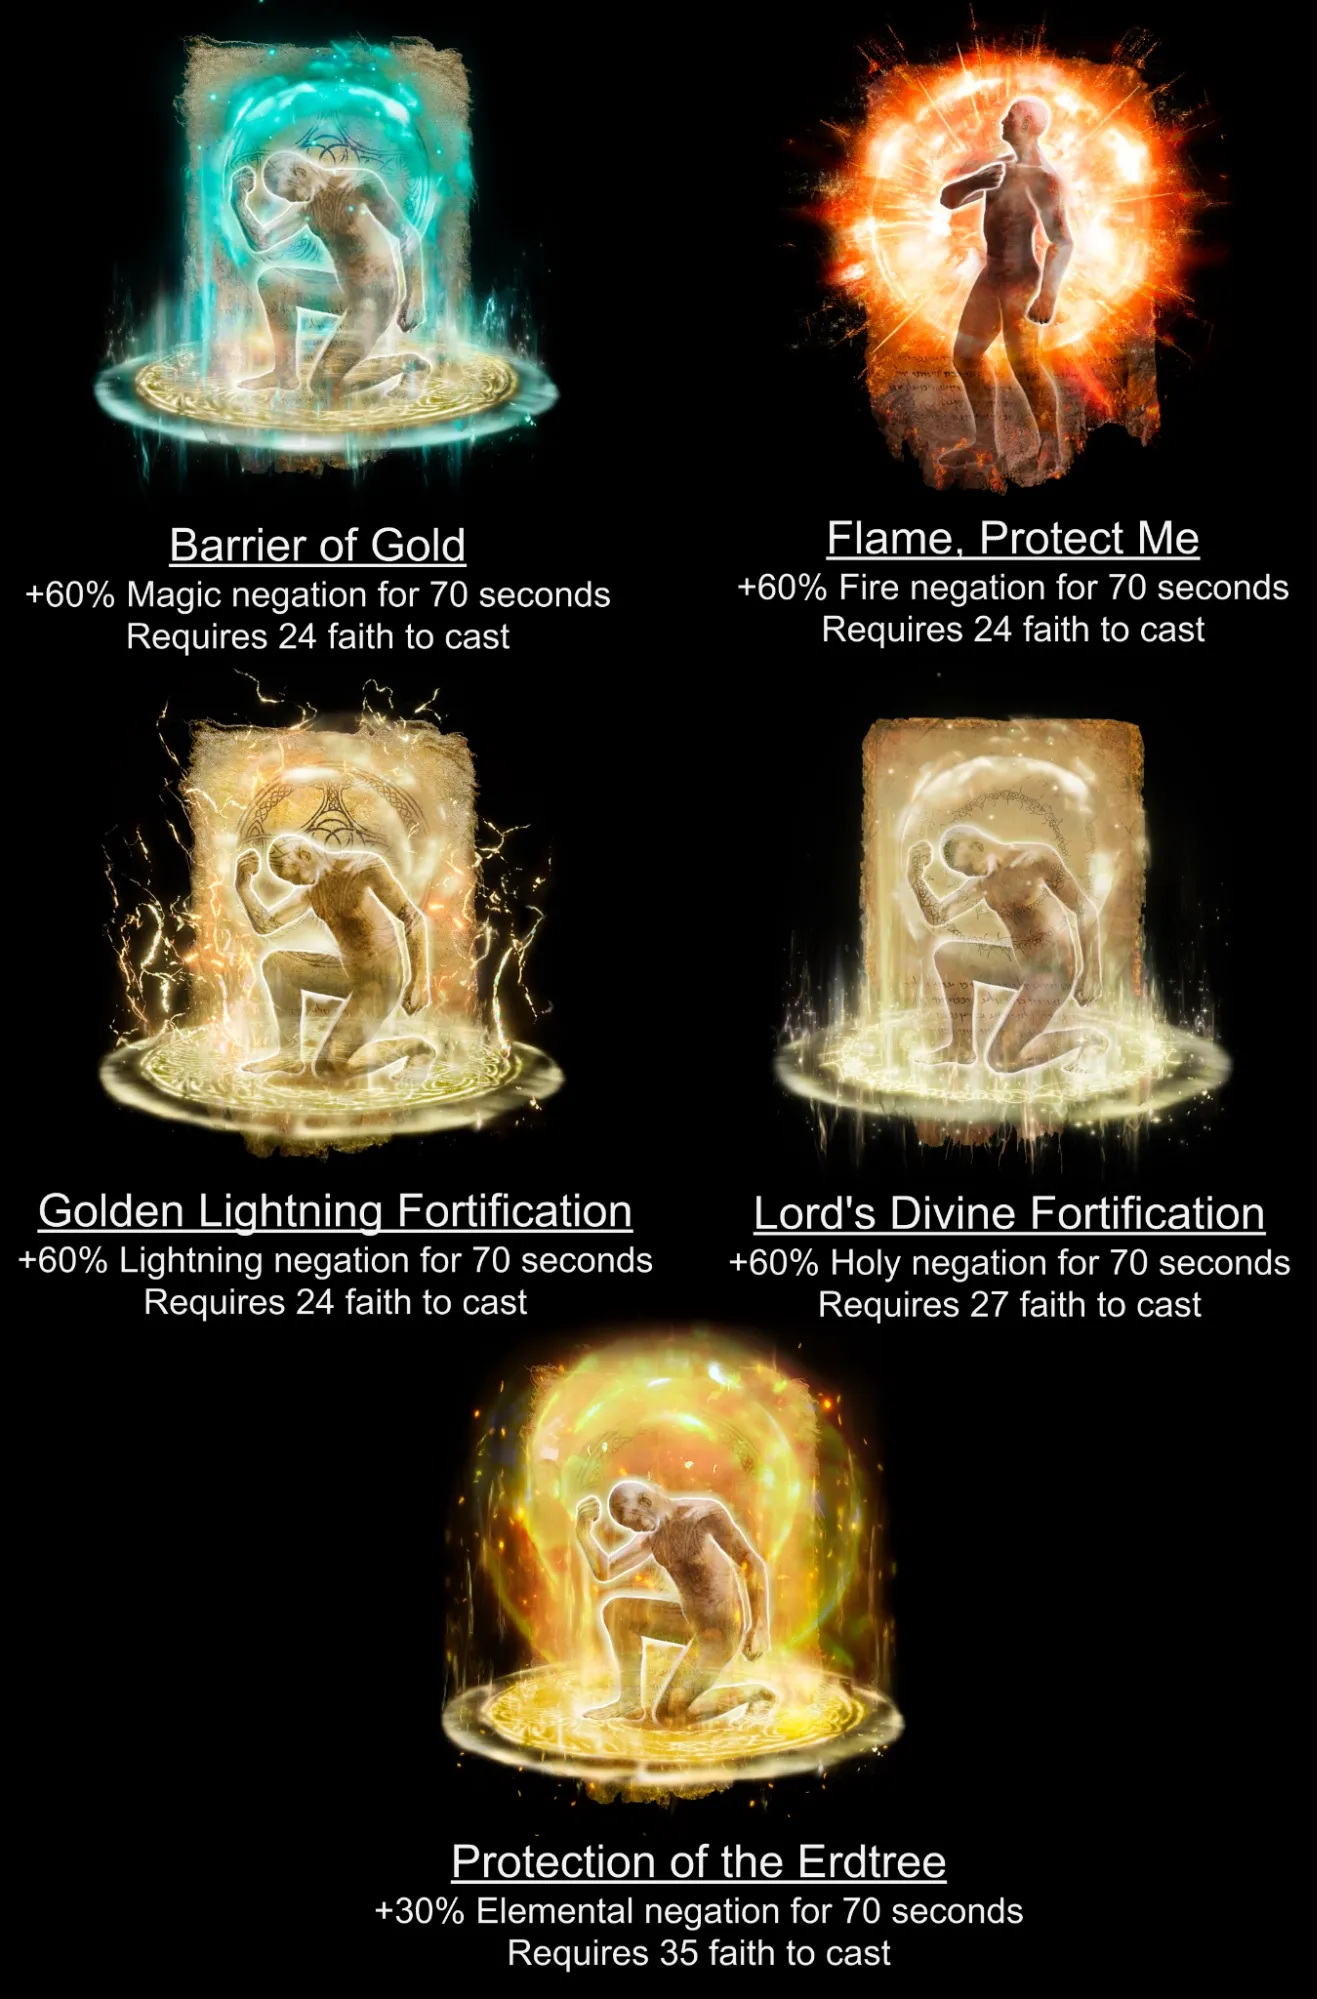
Despite these 5 affecting nearby allies as well, they are considered body buffs not auras. These are the greatest elemental negation buffs available for you. They let you survive what was before a one-shot attack. You’ll shrug off a mage’s sorcery, a dragon’s breath or a god’s attacks. The most common elemental type I've encountered in the DLC is Fire by far, as you’d expect from Messmer’s army. Unfortunately all these spells are fairly hard to collect and find, requiring you to complete late game areas and NPC quests. Flame, Protect Me is found right at the start of Giant-Conquering Hero's Grave in the mountains, locked behind an imp statue. Barrier of Gold is dropped by an invisible scarab in the area after the fight with Godfrey’s Golden Shade. Golden Lightning Fortification is dropped by a scarab on the cliffs south of the fountain plaza in Farum Azula. Lord's Divine Fortification is again either given to you by Gideon after you beat Malenia or sold by the Twin Maiden Husks after you defeat Maliketh. I find Protection of the Erdtree lacking but if you prefer having a universal, weaker spell, you can find it near where Goldmask first shows up in Altus, a bit east dropped by another scarab.
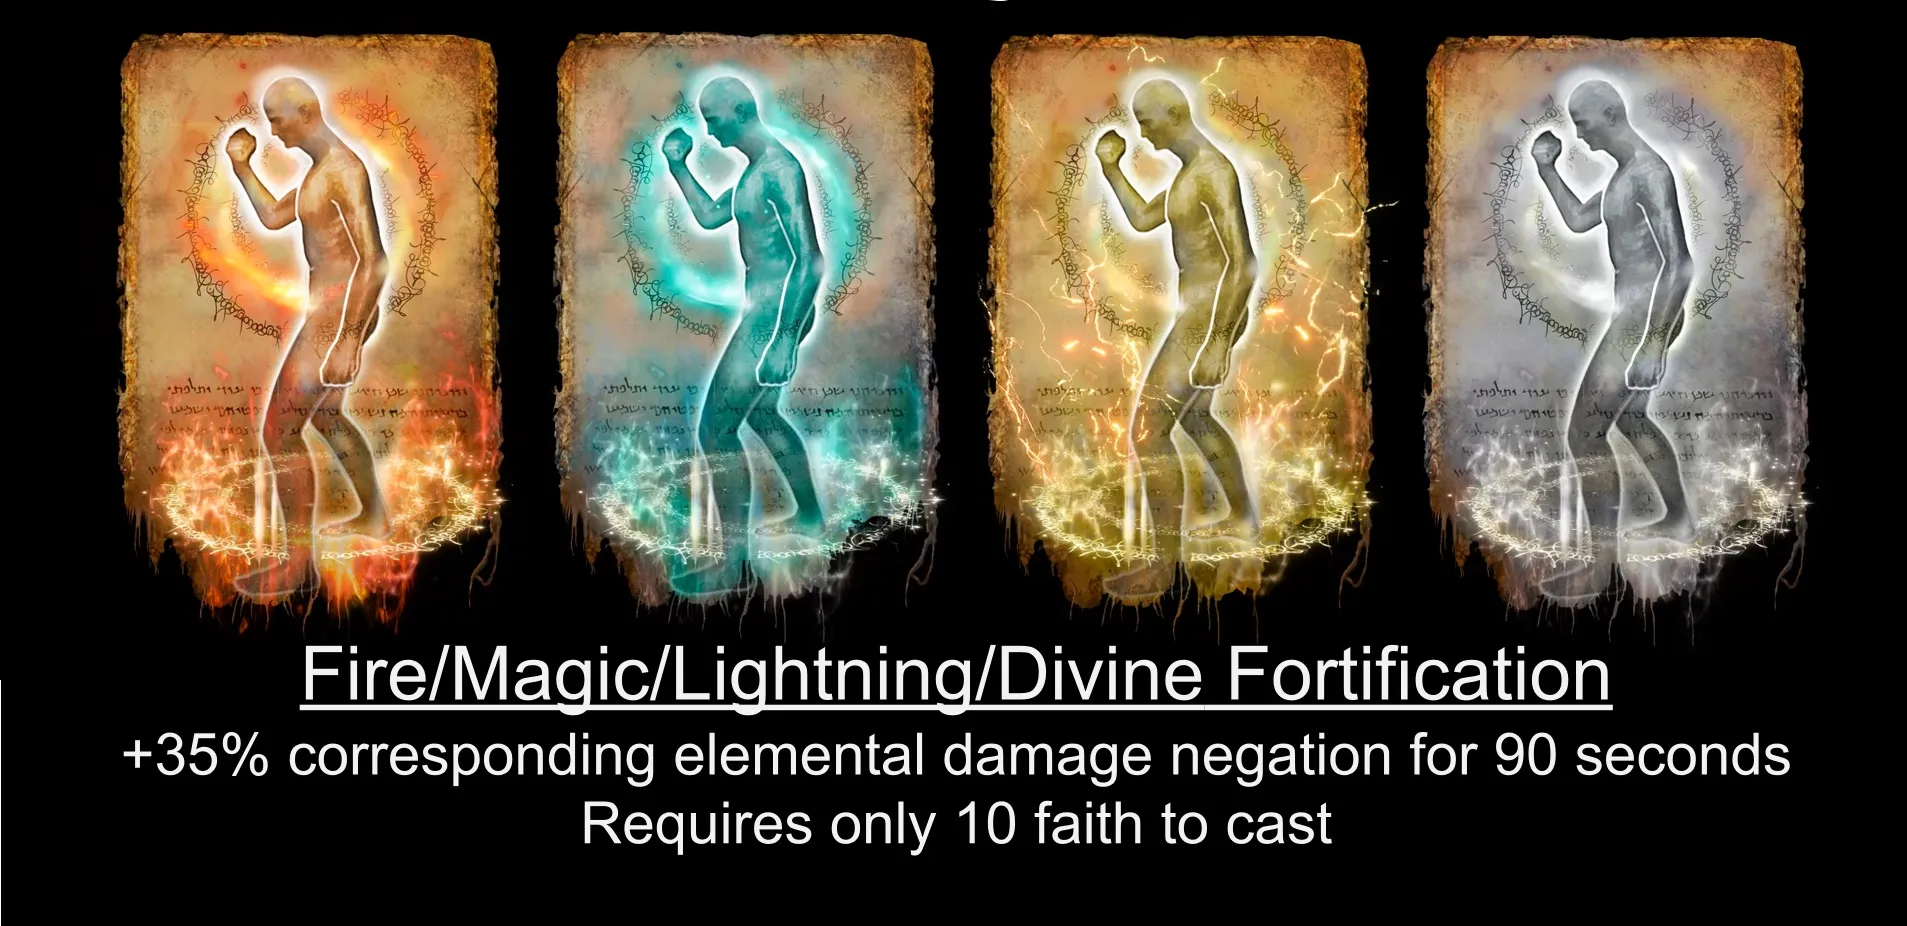
Brother Corhyn sells several Fortification spells which are weaker versions of the elemental negation spells above. They all provide +35% negation for their element and only require 10 faith to cast. The Magic and Flame Fortifications can be bought right off the start in Roundtable Hold. Lightning Fortification is sold by him after he moves to Altus. Divine Fortification is the odd one out as it’s dropped by a scarab in Weeping Peninsula, southwest of Tombsward Ruins. 10 faith is something any character can easily achieve, most classes have over that by default when you start the game.
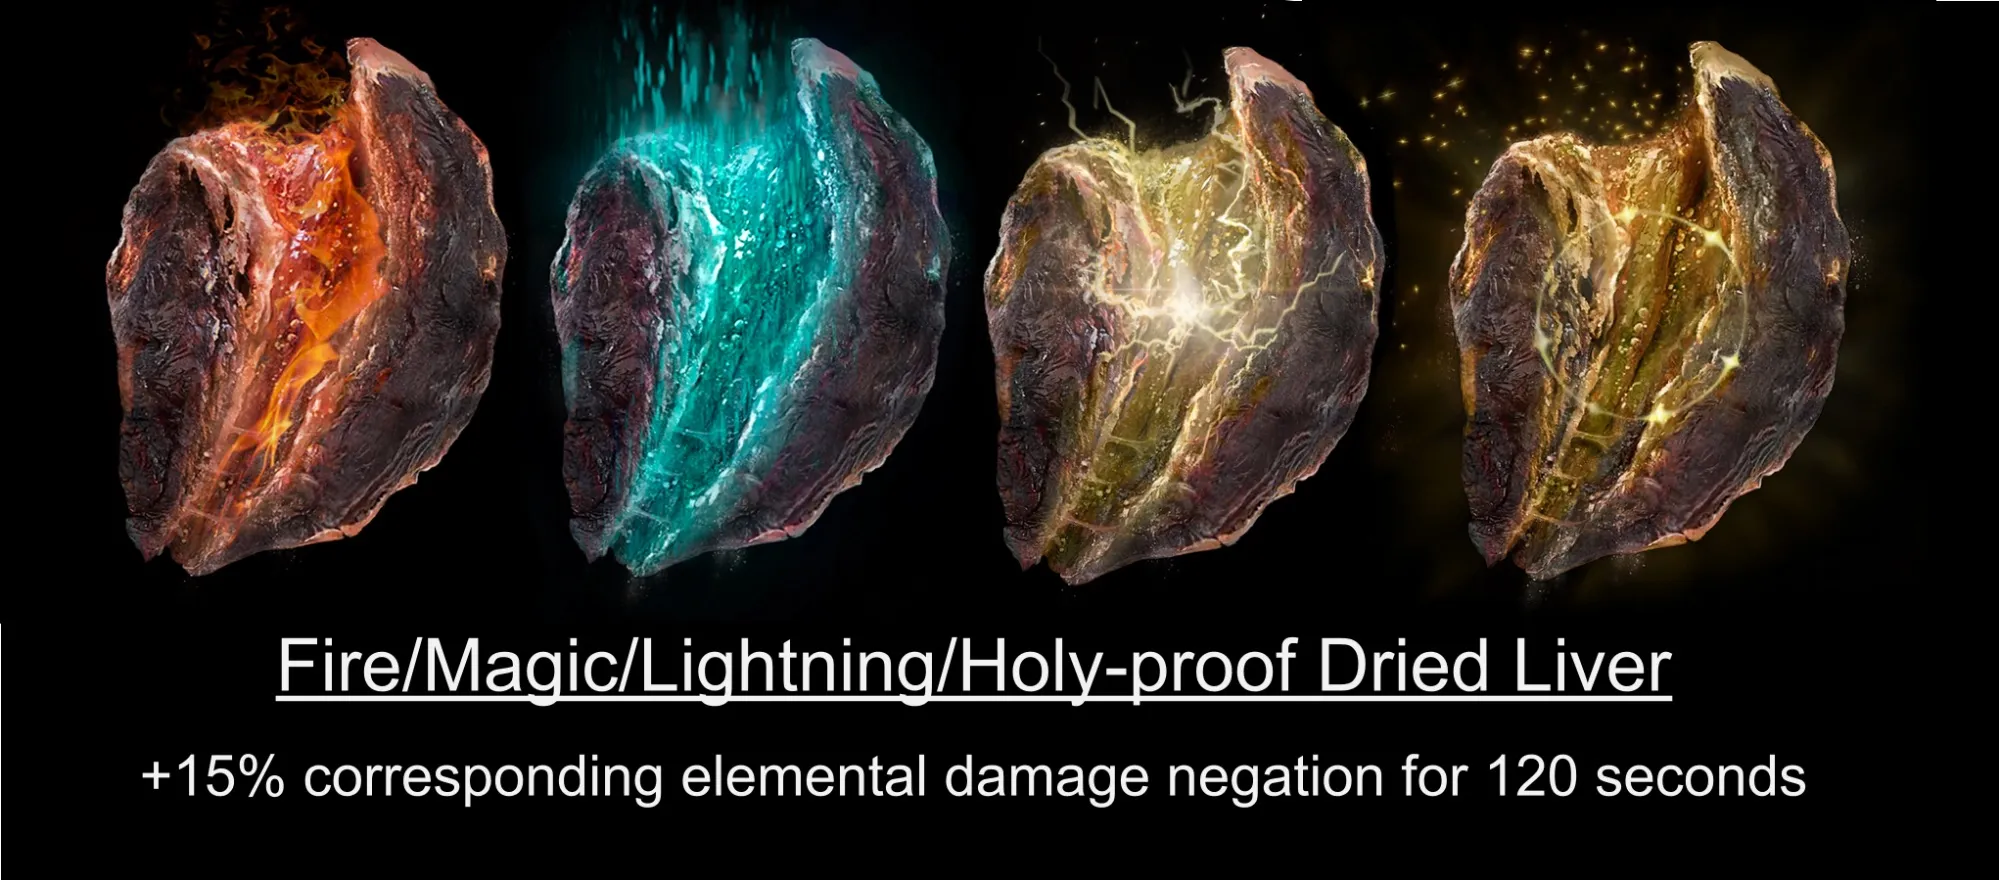
Like with the boiled seafood, there exists Dried Livers you can craft yourself that each provide 15% negation for the respective element for 2 minutes. The materials are fairly easy to find except for the Beast Liver itself, which only has a base 8% chance to drop from deer, springhares and sheep. As such I don't find them worthy to use over the Fortification spells.
Bonus Recommendations
Widen your tactics!
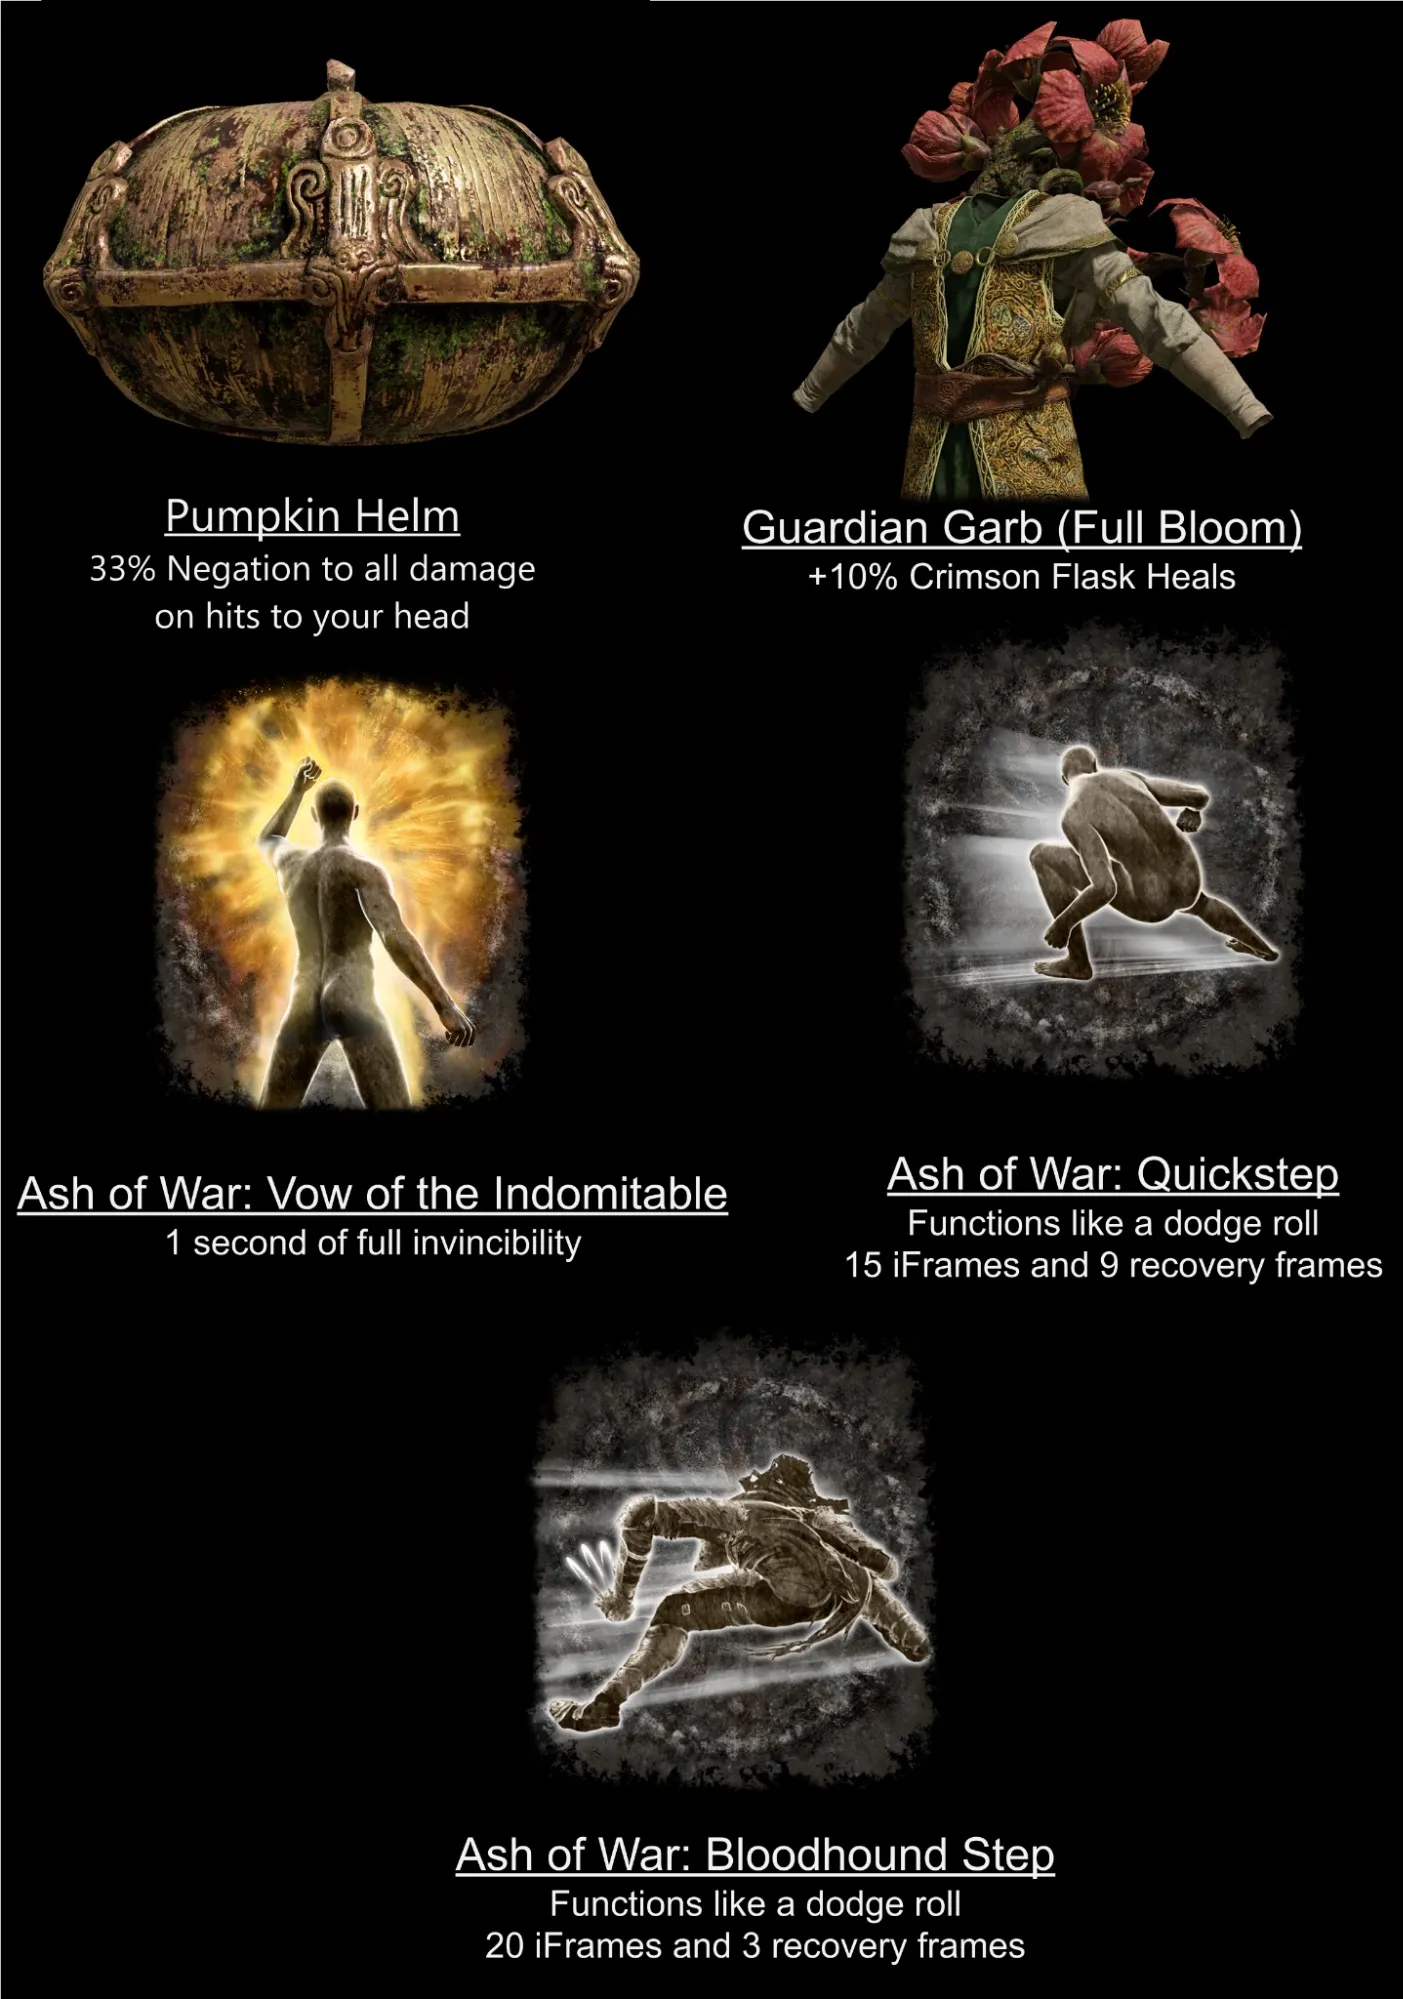
There exists a couple of shield buffs and special armours in the game that you may desire to employ in addition to all these spells and consumables. The Pumpkin Helm is a rare drop from the Pumpkin Head enemies which provides you with a permanent 33% defence to all damage that hits your head. This doesn’t refer only to arrows headshotting you but any vertical attack, slam and overhead smash enemies and bosses do. It won’t always apply, but from time to time saving a bit of HP may be the difference between victory or defeat. You can obtain the same effect from the Crucible Knot Talisman however that takes a talisman slot.
Guardian Garb (Full Bloom) is a rare piece of clothing only dropped by the Erdtree Guardians near the Erdtree Sanctuary Grace. It increases the healing from Crimson Flasks by 10% to the detriment of increased damage from fire. So as long as the enemy doesn’t do fire damage, or you negate this vulnerability with the various buffs I presented, you get a free healing increase.
Several Ashes of War offer you ways to ignore damage for a short while. Vow of the Indomitable, an ash for any shield, makes you entirely invulnerable for a whole second, letting you bypass any amount of damage and remain in place like an unmovable statue. You don’t even need to upgrade the shield as it makes you fully immune anyway. It’s dropped by a scarab, in the poisonous swamp area around the Albinauric Village in Liurnia, south from the Folly on the Lake Grace. Quickstep and Bloodhound Step function similarly to rolling but have much higher invincibility frames, basically acting as a “better roll”. The first is shorter distance but quicker than a normal roll while the latter is longer distance. Use whichever feels better for you. Quickstep can be bought from Bernahl at Warmaster’s Shack in Limgrave and Bloodhound Step is dropped by a Night's Cavalry at the bridge in front of the Lenne's Rise tower, in Dragonbarrow, Caelid. For reference normal rolling at medium equip load has 13 iFrames and 8 recovery frames.
Finally Shield Buffs transform your shield into an unbreakable wall. If you prefer to play slow and careful, you should always try to make use of these.
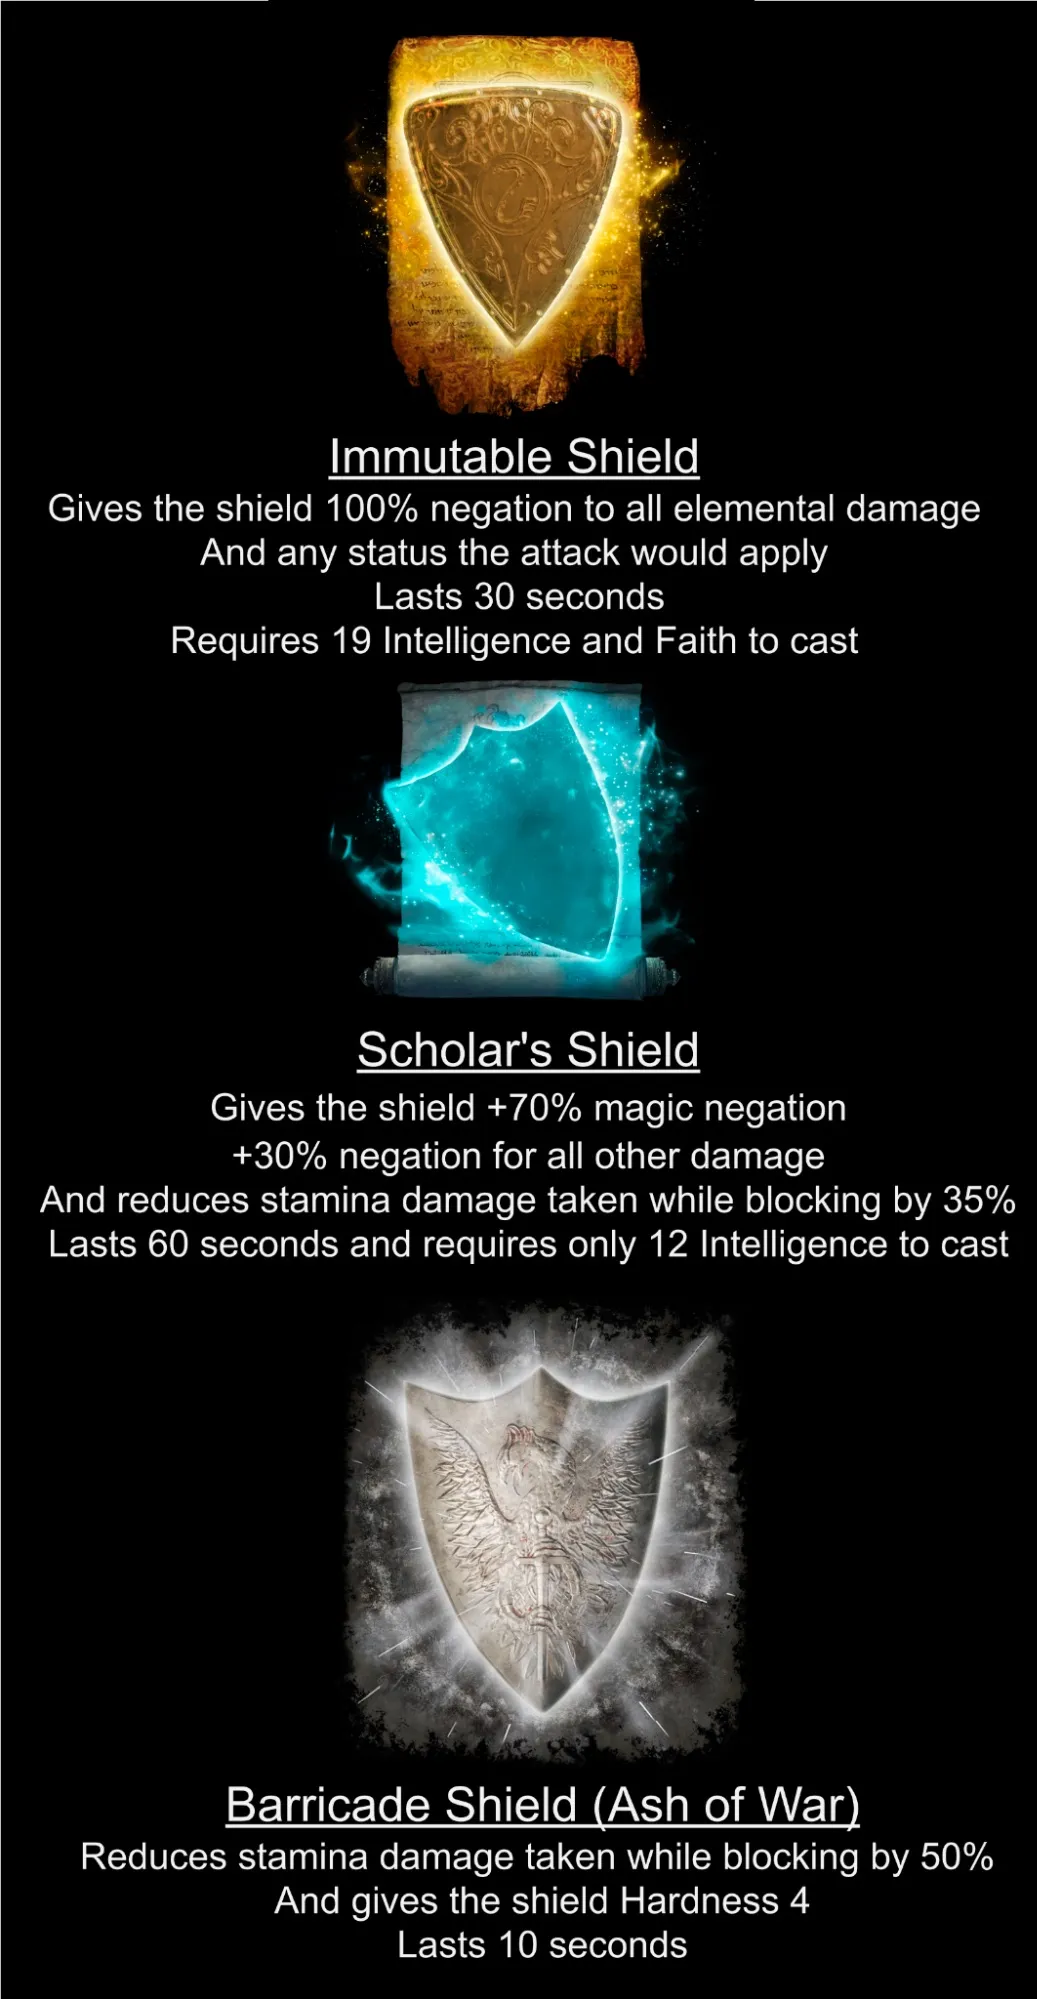
You can buy Immutable Shield from Brother Corhyn after you tell Goldmask the secret of Radagon. Scholar's Shield you can buy from Sellen after you meet her in Waypoint Ruins, Limgrave. Barricade Shield is an ash applied to the shield itself meaning you can easily activate it in battle. Hardness means most enemy attacks will bounce off the shield but it doesn’t always work with large creatures such as trolls or powerful beings like some bosses.
In case you didn’t know you can use thrusting weapon types such as spears, great spears, thrusting swords and great thrusting swords while guarding, allowing you to block and attack at the same time. Beware if you do this you may run out of stamina fast and if that happens, you’re left stunned for long enough for a boss to kill you. But “turtling” is a good strat for when you find yourself having a hard time, and reducing the stamina damage taken from enemy attacks with the shield buffs I mentioned lets you attack yourself more often while turtling. You may also employ the Greatshield Talisman that reduces the stamina damage taken while blocking by 20%.
Best Defence is a Good Offence
Sometimes killing an enemy quickly is better!
As you battle bosses and enemies you will learn their attacks and patterns. Over time you will find yourself dodging better and getting hit less often. And so you may opt to forsake some defensive talismans, spells or food for something offensive that will allow you to end the fight quicker. Golden Vow is in my opinion already the best defensive and offensive buff you can have, there’s no better aura for it. But there are a lot of body buffs that you may opt in instead. A quick rundown example of the best ones is in the image below. Besides these there are a myriad of offensive talismans you should cater to your build and strategy.


Leave a Comment