
Warcraft Rumble
Warcraft Rumble Beginner's Guide: Menu Navigation Tips and Tricks
Embark on your Warcraft Rumble journey fully equipped! Our comprehensive guide for beginners delves into the world of in-game currencies, providing a clear understanding of how to manage and utilize them effectively for ultimate success in the game.
So you've installed Warcraft Rumble, and/or you're curious about the game and how it plays. Look no further! We're here to break it all down and get you started: with our help, you'll be unleashing powerful armies upon your enemies in no time! Be sure to visit the other guides, as well, to get the full overview for maximum preparation. Some of this is explained in-game, of course, but much of it is not, leading players to confusion and frustration when they don't know everything they need to make informed decisions and be successful.
If you're looking for even more information, perhaps you'll find it in one of the other guides listed below:
- Beginner Tips, Gameplay Strategies, and Mini Traits Explained
- Understanding In-Game Currencies
- Menu Navigation Tips and Tricks
Chart A Course...to Adventure!
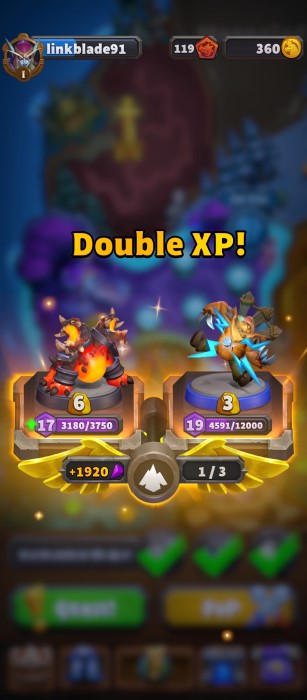
When you make that step into Warcraft Rumble and see the Map screen for the first time, things can be a little daunting. For being your initial window into the game, there's a lot presented all at once: some things are locked behind progression systems, while others are hidden in menus you wouldn't necessarily know are there. Here are a couple examples of what one might see each day:
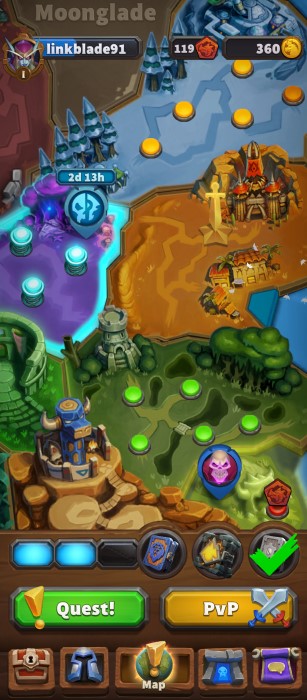
That's a lot of colors, buttons, and symbols, all providing information to think about! If you're having trouble discerning the important bits, have no fear: that's what this guide is for. We'll take each screen one by one and explain what you can expect to do there; you'll be on your way to adventures and battles in no time!
The Map Screen
The Map tab is where you initiate battles, participate in Arclight Surges, go on Quests, etc.; and it's where you'll spend a lot of your time. Taking the image above, we can break it down into more easily digestible pieces, like so:
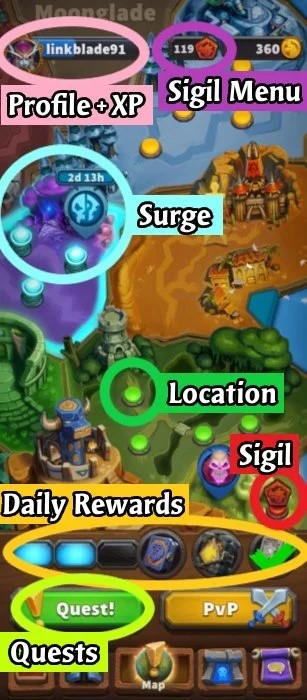
Locations
The colored dots that litter the landscape are individual missions, or locations. They are separated by regions, with five to a region. When you click/press on it, a small window will come up with an overview of the region's available battles. Clustered by difficulty level, you can tell at a glance how easy they'll be for your currently-equipped army based on their color:
- Green means they're on the easier side (where you are overleveled compared to the boss).
- Yellow and orange are medium difficulty (where you and the boss are more-or-less the same level).
- Red means the fight will be rather hard (where the boss has a higher level than you).
The first four battles of a region will be the same level, and they can usually be completed in any order; doing so will earn you a Sigil, which we'll explain more down below. After you've earned enough Sigils by completing missions, the final stage of the region will open, with a difficulty one level higher. These "Hard Battles" are usually more complicated or straight-up more difficult than the rest of the region, so be ready for a fight! Once you've completed a region - or at least collected enough Sigils - the next one will open, and you can move on should you wish. This gives you a little leeway to move past the missions that are giving you trouble, although you'll have to return to them eventually to proceed even further.
After a significant amount of progress - 50 Sigils to be specific - you'll unlock the "Heroic Campaign", which is a fancy way of saying you can replay all the older regions at higher levels, for more rewards! Heroic stages start at 10 higher than their original level, and feature new twists on the boss for added danger. Each one must be completed five total times to acquire its Sigil (and 300 gold), once with an army of each available family. Along the way you'll acquire an XP Tome for each family/faction as well, so there's a lot of potential reward if you're up to the challenge.
Arclight Surges
"Surges" are timed events that allow you to replay old missions with added rules to change up the strategy; they first become available after you've earned 22 Sigils. At time of writing, one appears each Tuesday, Thursday, Saturday, and Sunday: they are noted by a glowing blue border around the region where the Surge has commenced. Doing a Surge rewards you with 300 gold (60 per stage), with a free Big Red Button you can use in the Shop when you complete the whole thing. It also provides Guild XP with the family/faction you used to do each battle, which is explained in the Social screen section further below.
Profile & XP
Situated in the top-left is your Profile menu and your XP bar; tapping on it will open up a menu that looks like this:
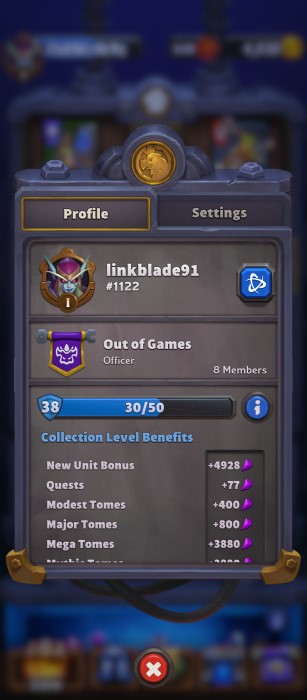
Here you can fiddle with your Settings, and see your Profile's statistics. When you click on someone in the Social screen, you can see this menu to learn what Guild they are in, what their current army looks like, and so on. Your Collection Level is also found here: every time you level up a mini or upgrade it to a new Rarity, you gain experience (XP) towards your Collection Level. Raising your CL in turn further boosts your XP gains and even gives you 75 gold to sweeten the deal. You gain 1 XP for raising a mini's level, and 5 XP for raising their Rarity.
Sigils & the Sigil Menu
Locations with a red dragon token on top have a Sigil which you can earn for defeating that stage for the first time. Starting out, they are the primary way you unlock new gameplay features such as access to the Shop, Guilds, and the Talent system for upgrading your units. You also need them to unlock new regions and the missions contained therein. If you were to tap on your Sigil total at the top of the screen, you'd get a menu that looks like this:
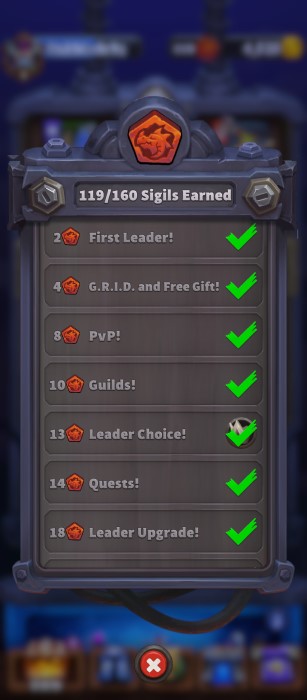
Remember to check back here when the menu glows red, as that means you've acquired enough Sigils to unlock something!
Daily Rewards
Towards the bottom of the Map screen is your Daily Rewards. These refresh every day with new stuff you acquire just by playing the game, three per day. To acquire them, simply play the game: you need to complete 3 missions per item (denoted by the blue boxes on the left) before you can claim whatever the reward is (pictured on the right). Quests are an exception, but in a good way: higher tier Quests grant you multiple ticks towards the next Reward, meaning you don't necessarily have to do 9 total missions every single day to collect everything.
Rewards are usually Tomes, which give you bonus XP for minis. On rare occasions you can also get a troop or leader of your choice, to add directly to your collection!
Quests
After acquiring 14 Sigils, you can go on Quests. Quests are one-off repeats of missions you've already done, to earn XP for a mini and progress towards your Daily Rewards. They are separated by tier, with green missions providing the base amount of XP (based on your Profile's Collection Level), while blue missions provide triple the XP, and purple Quests provide five times the XP! In terms of Daily Rewards, green missions are only one tick towards an item, but blue missions are two ticks and purple stages give you a full three ticks - a complete item's worth! They can also carry over to the next Reward, if necessary, so you don't have to worry about overdoing it.
When you go to select a Quest, you are given three options from the minis in your collection; these are all not completely random, though, so you can game the system a bit if you know how it chooses.
- One is the lowest-level mini in your currently selected army at the time the Quest refreshes.
- One is random, but only from within your currently selected army (but not the 1st option).
- One is always random, from anywhere in your collection (but not the 1st or 2nd options).
As-to when a Quest refreshes, that depends on how good the current one is: green/regular Quests refresh every 30 minutes, but a better Quest can last 8 hours. A timer is present to let you know when the stock will change, but you can also tell at a glance based on what color the Quest button currently is: if it's blue or purple, make sure to do it!
PvP (Player vs Player)
Next to the Quest button is the PvP button, which allows you to face off against other players for glory and prizes! PvP has its own map and rules to consider which change regularly, and becomes available after acquiring 8 Sigils. PvP is also tied to Guilds, in-that the Honor you earn from PvP matches goes toward your Guild rewards (explained below in the Social Screen section).
A Quick Side-Note About Tomes
When you acquire a Tome - either through a Daily Reward, a Shop offer, or elsewhere - you gain a significant boost in XP for select minis in your collection. Upon opening one, you are presented with a series of choices: two minis will appear in front of you, and you must decide which one will get the XP boost. Depending on the size of the Tome, you can have anywhere from 3 to 11 of these decisions to make regarding who receives XP. On super rare occasions, you can even get a double-XP choice, which can leads to a very sizeable increase in that mini's level progress.
Tomes can be general (as in, they don't have a preference who will be offered), or they can belong to a family/faction, which means the mini on the left will always belong to the family in question when it decides who to randomly offer. Very rarely you may acquire a Leader Tome, which has a similar bias but towards Leader minis specifically.
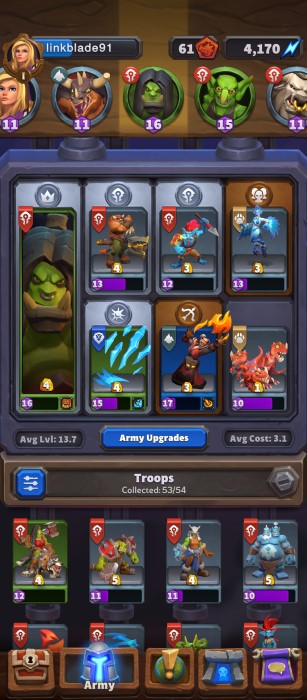
The Army Screen
Starting out, really only the Map and Army tabs will be available to you, but they are also the most important screens and where you'll be spending the majority of your time. Here you can browse through your collection of minis, assign troops to your Leaders' armies, and discern more information about them. You can also upgrade their Rarity here, once you unlock the Talent system.
Each army consists of eight total minis: a unique Leader, six slots for troops, and the Kobold Miner (which is automatic to the point where you don't even get to see it on this screen). As you develop your armies and upgrade their Army Slots, you'll learn that each Leader prefers certain types of troops, and can then tailor your composition toward their unique strengths. Upgrading your Army Slots requires going through Dungeons (which are explained in their own section), and each tier of Army Slot denotes how many bonus levels a mini of the correct type will be allotted. Bronze is one level, Silver is two levels, and Gold provides three bonus levels to those minis, which is currently the maximum. You get nothing extra if the mini doesn't match up with the Army Slot's type, so plan accordingly!
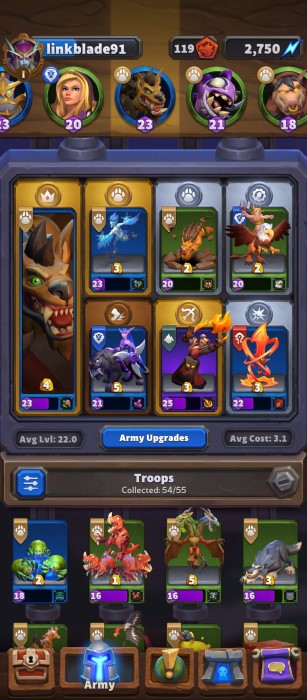
To see this in action, let's look at two examples from different periods of my progress:
- In the first image, the Horde Leader Grommash can be seen. He's so underdeveloped that his sixth troop slot doesn't have an upgrade at all! Looking at the top row, however, you can see the icons for Horde, Horde, and Squad minis: these are the troops Grommash prefers, so I tried to select minis that would work well in those slots. The bottom three slots are more customizable, so I have a Spell slot, a Ranged slot, and the aforementioned "empty" slot. Nowadays, all six slots are Gold, plus Grommash himself, so that's nice.
- In the second image, the Beast Leader Hogger can be seen. He's further along, with himself at Gold. He has a Beast, Beast, and Cycle slot-types on top, and I have chosen Fast, Ranged, and Spell on the bottom. I focused on upgrading slots for my best minis first, those being the Harpies and my absolute favorite: the Pyromancer.
The top three slots (the "preferred" slots) are set in stone: once you have them, you can't ever switch those. You can swap minis around, of course, but the type of mini that will receive the bonus levels cannot be changed. The bottom three slots are more flexible, up to a point, and those icons can be changed as necessary. When first acquired it'll more-or-less be random, but should you desire to swap them out, you can do so with the "Army Upgrades" button, which'll bring you to this screen:
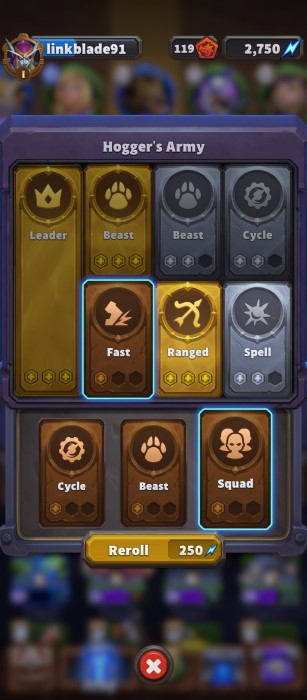
By spending Arclight Energy, you can swap out an undesired slot for a different one of the same tier. In the example above, I am being offered the option to replace my Fast slot with a Cycle, Beast, or Squad slot (see how it will remain a Bronze slot regardless). It'll set me back 250 Energy each time I do this, regardless of tier or how many attempts are made to get what I want. You also get to see your choices before you commit your resources, so in this instance, I chose not to swap out Fast at all.
Further down from the Army section, you'll find your collection of minis sorted by family/faction. By pressing on one and going to "Info", you can learn more about them, including what key abilities they have, their actual numerical information, plus a video showcasing their effectiveness. Here's what that looks like for my Pyromancer:
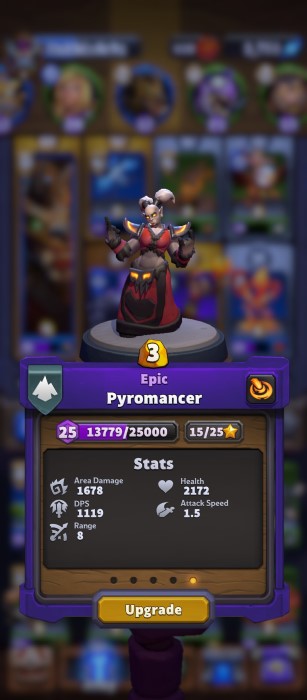
Any mini can go up to level 20 at its maximum for XP, but can go beyond that (up to level 30 currently) via their bonus levels. My Pyromancer hasn't reached either maximum yet, as she's still accruing XP; she has several bonus levels due to her acquired Talents and Army Slot upgrades, so that's why she is currently level 25. She's also only an Epic at this point, not a full Legendary mini, so there's still one more upgrade left to be had: with 10 more stars and some other resources, I'll be able to press the Upgrade button and be even closer to maxing her out! To fully see what you need for a mini to upgrade its Rarity, the button at the bottom will bring you to a screen that looks like this:
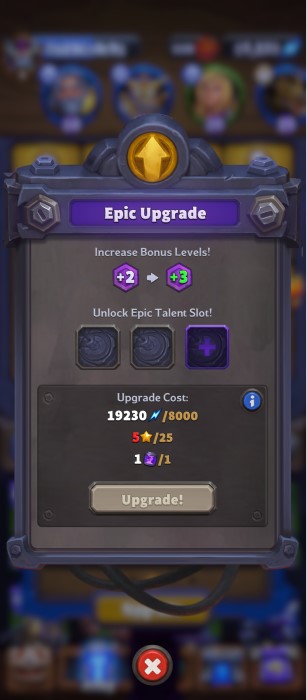
This image is for my other favorite troop, the Harpies. They're only a Rare, so to upgrade them I need 8000 Energy, 25 Harpies stars, and an Epic Core. Based on the picture I still need 20 more stars...but I have the rest! Once I can afford it, this will provide them another bonus level and the third Talent slot they are missing.
At the very bottom of the Army tab is where you can change out your Emotes, should you have acquired more beyond the standard set. You can currently only Emote during PvP matches, but perhaps we'll be able to during Raids as well once those become available.
The "G.R.I.D."/Shop Screen
One of first new things you'll gain access to in Warcraft Rumble is "the G.R.I.D.", which is a fancy term for the mini Shop tab. This opens after you acquire 4 Sigils. Here, you'll be able to use your hard-earned Coins to buy new minis, acquire Arclight Energy should you need more, browse daily offers, or you can spend actual money on special deals. Buying things below the G.R.I.D. is very self-explanatory: you click on an offer, you buy it, and away you go. There's even a Daily Reward (which actually refreshes every four hours after pickup) that provides free XP, and sometimes other goodies. On Sunday, you're given a Big Red Button and a Leader Tome for free, so that's something to look out for!
So with those out of the way, let's focus on the G.R.I.D. at the top of the Shop screen. The G.R.I.D. is a 3-by-3 table with slots for minis: they remain stationary until one of the following things happen:
- A purchase is made, which causes each other mini in that row and column to go away;
- A Big Red Button is used, which causes literally everything to refresh; or
- A daily reset happens, which causes the bottom row to go away and everything else to fall down.
All three can disrupt the G.R.I.D. and present you with new offerings. It sounds complicated until you see it for yourself, so let's show an example to demonstrate.
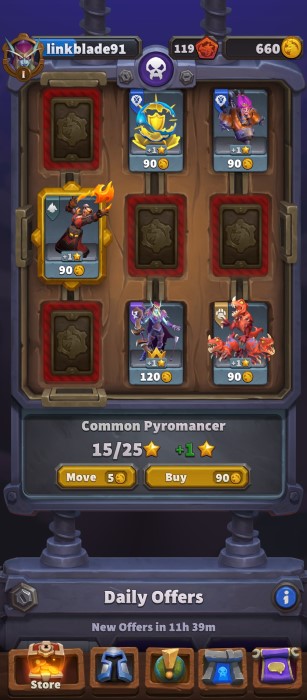
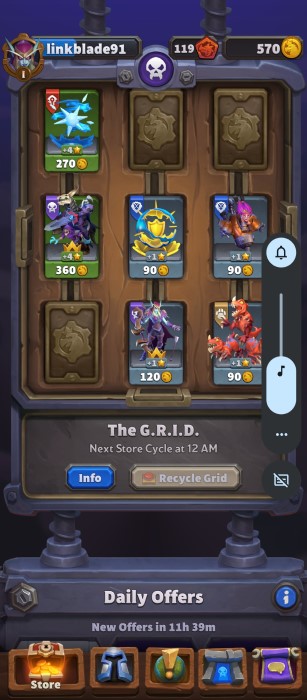
In the first image, you can see five choices available in the G.R.I.D., with my beloved Pyromancer selected in the middle-left. It would cost me 90 Coins to buy a copy of the Pyromancer (I already own the mini, so I'm only buying a star at this point) - if I were to do this, all of the red highlighted boxes would be destroyed/go away. That's the cost of doin' business. Thankfully(?), nothing is in those boxes at the moment, so nothing is lost: the Holy Nova and S.A.F.E. Pilot minis would drop down, and the Sylvanas and Raptor minis wouldn't go anywhere. New stuff will come in on the left column and/or the top row to fill the space, and sure enough, it does: in the second image, you can see the consequences of my purchase, with a Chain Lightning mini and Baron Rivendare mini coming in.
Sometimes XP boosts will appear in the G.R.I.D.: buying a mini in the same row or column as the boost will consume it, applying the XP to that mini.
You can also spend 5 gold to move a mini one space up/down or to the side, which may be required to keep it from being removed by another purchase or from sliding off the table at day's end.
Finally, something to keep in mind is that, each week, a different family/faction will be made the focus of the G.R.I.D.'s offerings. All regular troops will be available still, but any Leaders that appear in the G.R.I.D. will be from that family only. This allows you to better aim for a particular Leader, since you'll have to sort through less options (i.e: three Undead Leaders instead of literally all Leaders). The rotation for the factions goes Alliance -> Horde -> Blackrock -> Undead -> Beast, before starting over again. We don't know why they're not in alphabetical order like they are in the Army screen; some mysteries of the universe will remain as such to the end of time...
The Dungeon Screen
Dungeons (and Raids) are one of the last main features you unlock in the game, requiring 30 Sigils to access this tab. Here you can access Dungeons that change on a weekly basis, as well as Raids (whenever they become available).
Dungeons
Dungeons are unique sets of three missions that are supposed to be completed in succession. Dungeons reward Arclight Energy, for upgrading your mini's Rarity, and also are the main means by-which you upgrade your Army Slots (as discussed in the Army Screen section above). After each victory, you receive some Energy as well as an Ankh, which allows you to replay a Dungeon mission one time should you fail. You might only get a couple extra shots at a boss before your Dungeon run is deemed a loss, so make it count!
When you first select a Dungeon, you might be presented with something akin to this image:
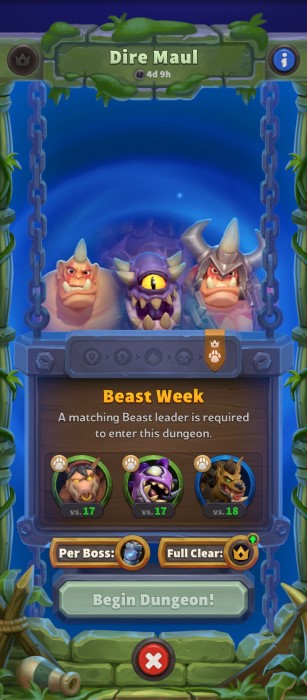
Dungeons rotate through the five families/factions in this order: Alliance -> Horde -> Blackrock -> Undead -> Beast. Clever observers will notice that's exactly the same as it is for the Shop screen. Each week, Leaders of the next family in line will be offered opportunities to face the provided Dungeon. The level of the Dungeon starts at 5 for each Leader, but increases based on how strong the Army has become: if your army had an average level of 6, it might only go up one level and now you're even. But if you were level 10 when you completed it, the Dungeon might increase by a maximum of 3, to level 8. This carries over to future runs, even if you wait until the next time the family becomes available weeks later. In a similar manner, the number of Army Slot upgrades you are offered depends on the level difference between where you started and how low the Dungeon is: you might earn 3 upgrades at once in later runs, to save time and catch up to how strong you presently are.
Once you've selected your Leader and you're happy with your army composition, it's time to delve within! Before the start of each Dungeon mission, you'll have to choose one of three "Relics" which can improve the strength of your army in various ways. You might gain Stealth for your Flying minis, or maybe you'll summon a free Grunt every time you play a Horde mini; the Relics available to select are slightly random, but still tailored to what your army can currently do. If you had no Flying units, you wouldn't be offered a Flying-based Relic, so at least you won't get something completely useless. In this way, changing your composition might lead to new Relic choices, so when in doubt you can change it up and try again!
Should you lose a Dungeon run, you'll have to restart from the beginning at the same level it originally was. The Relics offered will also be the same (unless you change your army around).
Raids
At time of writing Raids are not currently available, a "Coming Soon" sign hinting at what might be. According to Blizzard, they will require two Guild members to team together to defeat progressively-harder "Wings" of the Raid, culminating in a final boss battle. Here you will earn Valor for upgrading gold Army Slots to platinum Slots, which presumably means a fourth bonus level for the mini contained inside, alongside other rewards. Completing the first planned Raid, Molten Core, will also gift players with the Ragnaros Leader!
The Social Screen
After acquiring 10 Sigils, you'll gain the ability to join a Guild, and thus the Social tab opens up to you. Joining a Guild is as easy as finding one that looks appealing to you (or better yet, contains someone you know), and choosing the Join button! The Guild may be set to Private, though, which would require you to wait for them to Approve/Deny your invite request. For example, our official Guild, OutofGames, is set to Private, to avoid being swarmed by silent players who just want to eat up rewards and don't care about interacting with each other. We're looking for fun, social people who like to engage with each other and help out :) If that interests you, head here and let us know your screen-name!
Anyway, when you first enter a Guild, the main screen you'll see is a scrolling chat window for Guild members; pretty self-explanatory. There is a button on either side at the top: the left one leads to your Guild's Profile screen, while the other is your Guild rewards.
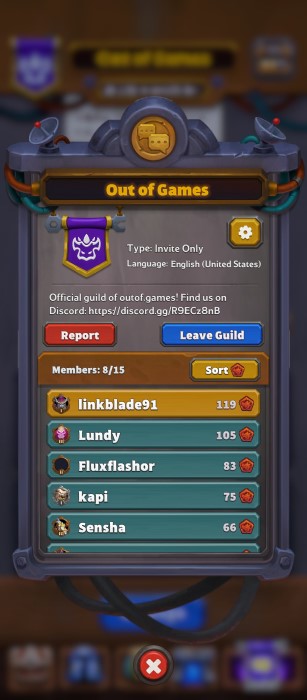
The Guild Profile screen is just like your own Profile screen, allowing you to see your fellow members and their progress. This is also where you would Report a member, or leave the Guild. The Guild Reward screen is the main reason you'll venture to the Social tab outside of just chatting, to check on how well the Guild is doing and claim any rewards it might have earned.
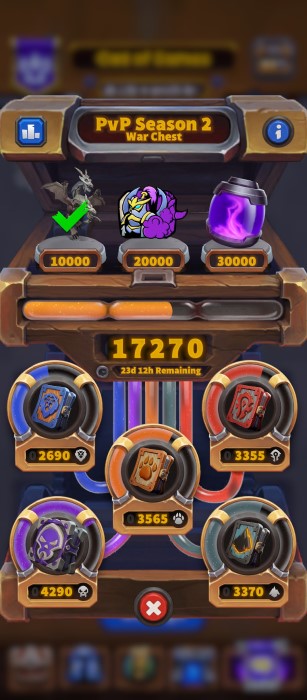
During each 6-week Season, you'll earn Crests by participating in PvP (player vs player) matches or by completing Arclight Surges. The family of the Leader you use for these activities determines which Crests you'll earn, which go towards the five totals presented on the bottom of the second image above. By working together, you can obtain Tomes for each family, as well as the main prizes at the top. This includes brand new minis, such as the Sylvanas Leader in Season 1, or the Chimaera troop in Season 2. The button on the top left of this page will show you individual progress totals, so you can see who is pulling their weight and which families they've been working on!
And that should be everything you need to know to get started! With this information flowing through your brain, you'll be navigating the menus and accessing your upgrades like a pro. If we missed something, let us know in the comments below! If you wish to learn more, check out the other guides as they become available - we plan to continue with starter guides, plus some more in-depth material for when you're ready to make decisions on building your armies and tackle certain challenges.
About_Author
Hello, my name is Sera! Card games, board games, video games; I enjoy games of all flavors, from Talisman to Wingspan, Borderlands to Elden Ring, and beyond. I live to play, or so the saying goes...when I'm not busy working, or depressed, or suffering from choice-paralysis 'cause there's too many great games to pick from D:
More_Warcraft Rumble_Guides
How Standard Rotations Work in Hearthstone - Year of the Scarab

Steam Wallet Pending Balance? Here’s Why Your Sale Funds Are Delayed
Top Money-Making Crops to Plant During Spring in Stardew Valley
Latest_Warcraft Rumble_Guides
// join_the_conversation
Sign in to share your thoughts, vote on comments, and connect with the community.
Comments
// no_comments_found
Be the first to share your thoughts!
Leave a Comment