
Welcome to our Blight league mechanic guide! If you're into tower defense games, then this might just be one of your favorite mechanics in Path of Exile. We'll start by tackling the classic Blight encounter, talk about some of the unique mechanics at play and then we'll take a look at loot, end-game Blight content and ways to squeeze the most out of this mechanic.
Blight is considered Extra Content, meaning it has a baseline non-zero chance of being randomly encountered in maps.
Our league mechanic guides are structured according to "Depth" - the deeper you go into the article, the more complex the mechanics get. If it all becomes too much, take a break from this guide, play with the league mechanic enough to master the fundamentals then come back and delve deeper!
Difficulty: Average
Complexity: Average

The icon that denotes Blight content and rewards of the Blight type.
- Blight league launched in September 2019 and has been part of the game since.
- word
Depth 1 - The Blight Purification Pump
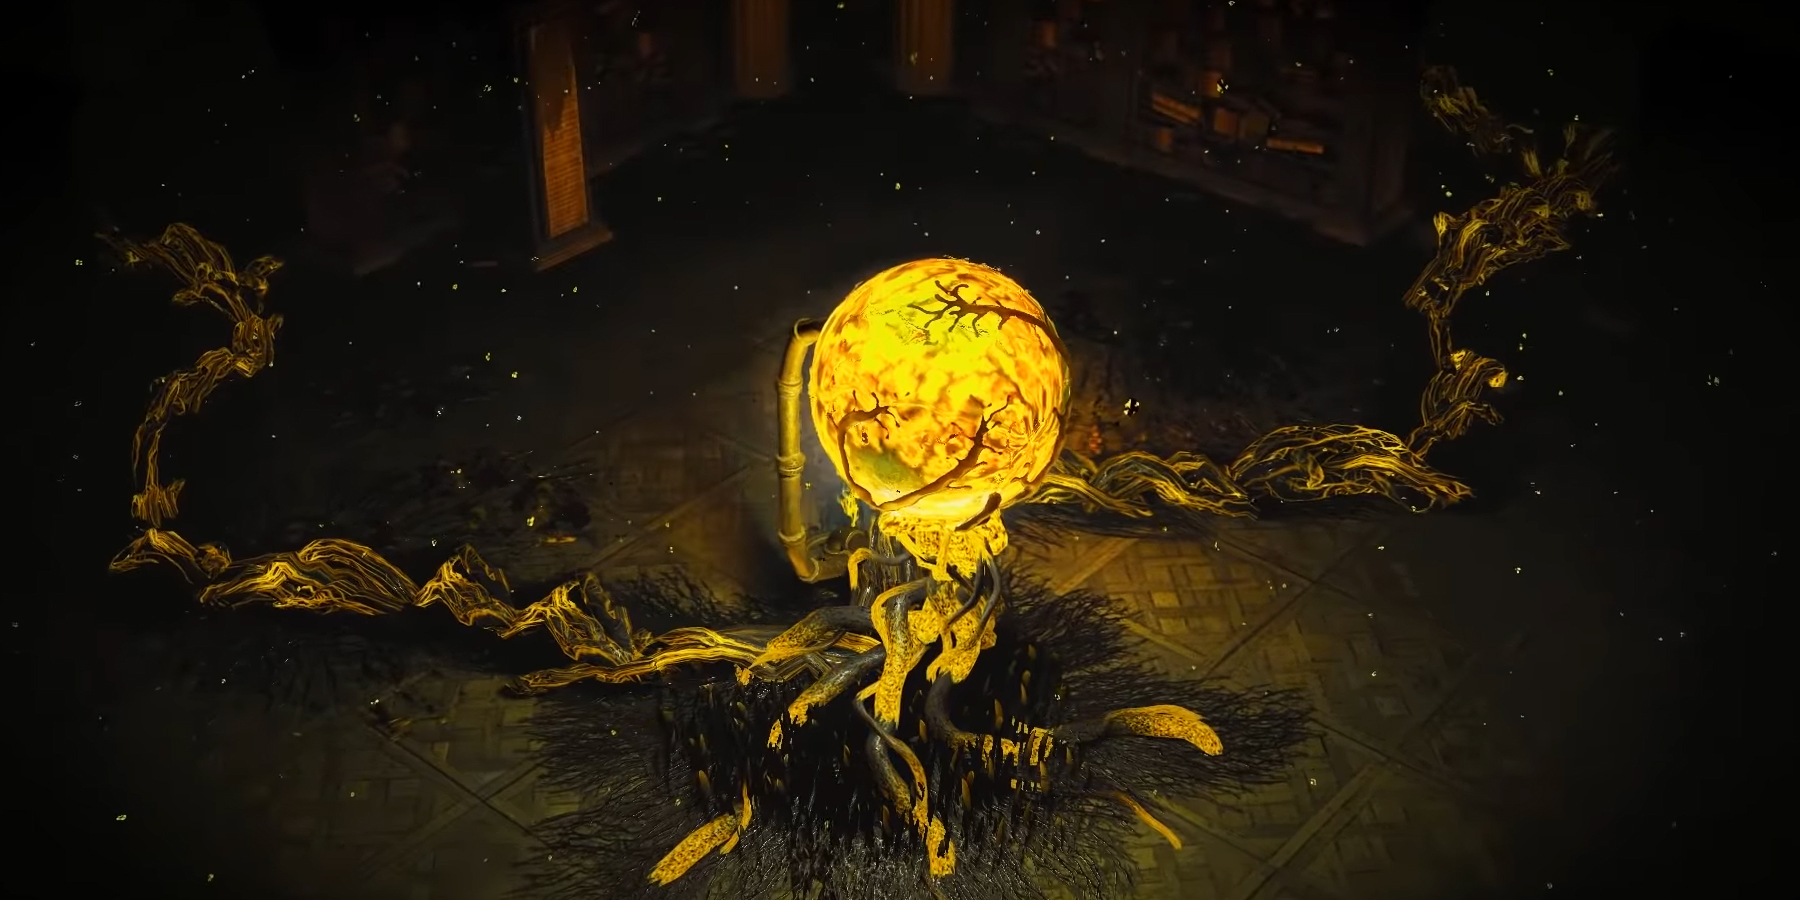
Blights are basically Path of Exile's take on the tower defense genre. In your maps, you may come across Cassia, the league's NPC, sitting next to a Fungal Growth. Like all things in Path of Exile, this growth will spawn monsters. Let's see how a Blight encounter plays out:
- You click on the Fungal Growth, and Cassia throws a Purification Pump next to it. Suddenly, sickly yellow roots grow out of the... growth, in random directions!
- These roots are the equivalent of monster lanes in tower defense. They are the path monsters will take to reach the Purification Pump. A typical Blight encounter can have as little as one root, and as much as eight.
- After a short grace period, shown in the timer at the top of the screen, waves of monsters will begin to pour out from the ends of the roots and make their way to the Purification Pump.
- During the grace period, you'll notice a few buttons hovering above the roots. You can click on those to build a tower, an automated helper that will aid you in defeating the monsters and hopefully, prevent you getting overwhelmed.
- The Purification Pump has 10 health. If it reaches zero, you've failed the encounter.
- A Normal monster will deal 1 damage to the pump.
- A Magic monster will deal 2 damage.
- A Rare monster will deal 5 damage.
- A Unique monster (Blight boss) will deal a whopping 10 damage.
- If you successfully complete the encounter and kill all the monsters with your pump still alive, you'll get a loot explosion around it! Additionally, you'll find reward chests at the end of each root!
- Occasionally, you might get a Blight boss to appear. Make sure to start hitting it early, since it's got a lot of health, but don't forget to keep track of monsters coming from other lanes! Blight bosses also have some pretty dangerous abilities, beware!
This might all sound a little scary and indeed, it's quite easy to be overwhelmed by the amount of monsters that spawn - some of which also attack you, on their way to the pump. Thankfully, towers are your friend. Let's take a look at how they can help you.
Depth 2 - Blight Towers
Blight Towers come in six varieties. Each one you build starts at Tier I and can be upgraded all the way to Tier IV. Blight towers:
- Cost 100 Blight resources (B-Bucks?) to build. You can see your resources at the bottom of your screen once you start a Blight encounter.
- You'll always get some for free at the start. You get more resources by killing Blight monsters.
- Each further upgrade costs more: 150, 300, 500 resources.
- The Tier IV upgrade lets you choose between two different "final forms". These radically change how the tower works.
- In conclusion, we can say each tower type has three different forms: Tiers I-III, and the two forms you can choose for Tier IV.
Let's take a brief look at what all towers do at Tiers I through III:
- Chilling Tower: Deals Cold damage and Chills enemies. Upgrades increase damage, effect of Chill and the maximum amount of monsters it can hit at once.
- Fireball Tower: Casts Fireballs at enemies. Upgrades increase the amount of Fireballs cast (TII has three Fireballs, TIII has five), as well as its maximum range.
- Shock Nova Tower: Deals Lightning damage. Upgrades increase damage, chance to Shock and its maximum range.
- Summoning Tower: Summons 3 minions with melee attacks. Upgrades increase the number of minions summoned (TII summons five minions, TIII seven).
- Seismic Tower: Causes 3 consecutive ground tremors around itself, slowing down enemies. Upgrades increase the amount of tremors (TII does five tremors, TIII seven).
- Empowering Tower: Improves the effectiveness of other towers, but deals no damage. Upgrades increase it maximum range, being able to cover more towers.
You'll notice these towers' icons may also be associated with a Blight lane. This means the monsters that spawn on that lane are resistant to towers of that type. If your own damage isn't too great, make sure you use the right towers for the right lanes!
Now, each tower has two Tier IV upgrades that drastically change how it functions. Let's take a look at them:
| BASE TOWER TYPE | TIER IV UPGRADE 1 | EFFECT 1 | TIER IV UPGRADE 2 | EFFECT 2 |
| Chilling Tower | Freezebolt Tower |
| Glacial Cage Tower |
|
| Fireball Tower | Flamethrower Tower |
| Meteor Tower |
|
| Shock Nova Tower | Arc Tower |
| Lightning Storm Tower |
|
| Summoning Tower | Scout Tower |
| Sentinel Tower |
|
| Seismic Tower | Stone Gaze Tower |
| Temporal Tower |
|
| Empowering Tower | Imbuing Tower |
| Smothering Tower |
|
As you can see, there's lots of potential to mix and match towers to complement your playstyle. Generally, the most important thing to do with towers is to keep minions stalled, giving you more time to kill them before they reach the pump. As such, Chilling and Seismic towers are likely to always be a part of your strategy. We'll take a closer look at some popular combinations of towers in Depth 5.
Depth 3 - Blight Loot (Reward Chests, Oils)
You'll always get a vast range of rewards for completing Blight encounters. These come in the form of reward chests, which can belong to an item type such as Currency, Divination Cards, Armor, Jewellery. They can also be themed around different leagues, such as Breach, Legion, Harbinger, Abyss and more.
Some of these reward chests will be of the Blight type! They will always contain some Oils, the main currency items of Blight, and a chance at getting a Blighted Map, but we'll tackle those in the next section!
Oils come in fifteen varieties, with two of them being special. The non-special Oils are, in order of their rarity:
| Clear Oil | Sepia Oil | Amber Oil | Verdant Oil | Teal Oil | Azure Oil | Indigo Oil | Violet Oil | Crimson Oil | Black Oil | Opalescent Oil | Silver Oil | Golden Oil |
Naturally, the further to the right you go in that table, the rarer the Oil is. Thankfully, if you're missing a specific Oil, there's a very simple vendor recipe to get it:
- 3x of the same oil, sold to a vendor -> 1x Oil of the next higher tier
Bear in mind that using this recipe to get one of the rarer Oils while selling very common ones will get ridiculous very quickly. To get one Golden Oil selling only Clear Oils, you'd need 531,441 of them! Also, Oils have a level restriction based on their rarities:
- Golden Oils only drop in areas of level 80 or higher.
- Silver Oils in areas of 78 or higher.
- Opalescent Oils in areas of 73 or higher.
- Black Oils in areas 68 or higher.
These Oils can be used to anoint items and grant them new properties. There are three types of anointing:
- Anointing a ring, which will enchant it with a modifier that upgrades one of your towers in a certain way.
- Anointing an amulet, which will allocate a Notable passive node on your Passive Tree without requiring you to path to it.
- Anointing a Blighted map, which will add additional useful modifiers to it, but we'll talk about that in Depth 4!
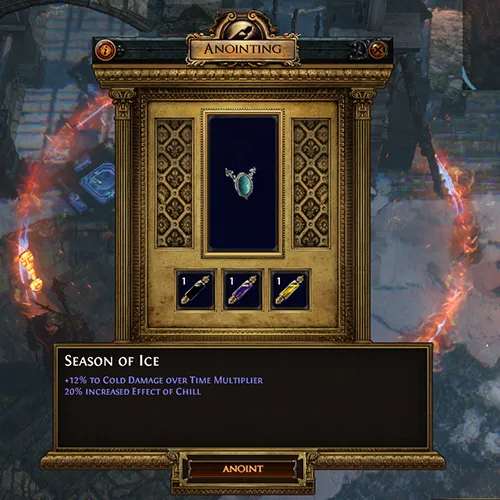
Anointing works by talking to Cassia, which will open up the Anointing interface. Put an item from the types above in the box, and a combination of two or three Oils in the smaller boxes. Each combination of Oils will result in a different outcome. The lists for ring and amulet anoints are huge, so we've only selected a few to showcase here:
Example anointments for rings, which require 2 Oils to anoint:
- Crimson Oil + Crimson Oil - Your Meteor Towers always Stun.
- Indigo Oil + Silver Oil - Your Lightning Storm Towers create Storms centres on Enemies
- Clear Oil + Black Oil - Your Seismic Towers have 25% increased range.
- Check out the full list of ring anointments HERE.

Example anointments for amulets, which requires 3 Oils to anoint:
- Verdant Oil + Black Oil + Black Oil - Anoints Righteous Army
- Opalescent Oil + Golden Oil + Golden Oil - Anoints Charisma
- Clear Oil + Clear Oil + Clear Oil - Anoints Alacrity
- Check out the full list of amulet anointments for Notable nodes on the Passive Tree HERE.
//they're already clearly displayed in POB; if we were to do a 'list' of anointments, it'd probably be better to just find a way to implement them into an in-house passive tree
Yup, there's a few secret Notables that can't be found on the Passive Tree and can only be allocated through anointing! Here's a couple of them:
- Azure Oil + Golden Oil + Golden Oil - Allocates Tranquility
- Clear Oil + Azure Oil + Golden Oil - Allocates Cleansed Thoughts
- Check out the full list of hidden anointment-only Notables HERE.
Now, we mentioned two special Oils. These are the Tainted Oil and the Reflective Oil, which allow you to anoint Corrupted and Mirrored items, respectively. They have special drop restrictions:
- Reflective Oils only drop from Blighted Maps and Blight-Ravaged Maps (spooky, what could those be?).
- Corrupted Oils only drop from Corrupted Blighted Maps or Blight-Ravaged Maps.
We'll talk about these special Maps in the next section.
Depth 4 - Blighted Maps
Blighted maps are, essentially, longer Blight encounters that are more dangerous but come with a lot more rewards. Here's a general overview:
- Blighted maps can drop from any Blight encounter.
- They do not have any regular monsters or map bosses. Instead, the map is much smaller and contains only a big Fungal Growth.
- When you activate the Blight event, a 5 minute timer appears at the top of your screen, and roots will burst out and travel away from the Purification Pump.
- As the timer ticks down, a lot more roots will keep bursting out of the ground. Make sure you're building a good amount of towers around your pump!
- Speaking of towers, prioritize building towers near your pump, and try to stay in the area. When you're further than two screens worth of space away from a tower, it stops functioning. From this point on, any mentions of "pump area" refer to the area around that pump that is at most two screens away from the pump.
- A Blighted map is guaranteed to spawn a massive amount of monsters and whole bunch of Blight bosses. You'll see the bosses on the minimap, indicated by this icon:
- In the last minute, roots will start closing and the encounter will start winding down. After the timer expires, kill the remaining monsters to complete the encounter.
- The Purification Pump has 20 health in a Blighted Map, giving you a little more leeway for mistakes.
These maps can be crafted the same as with regular maps, such as turning them Rare or using Catrographer's Chisels. They can't, however, be used with Scarabs, and your Atlas Passive Tree has no effect on them. Thankfully, they can be anointed!
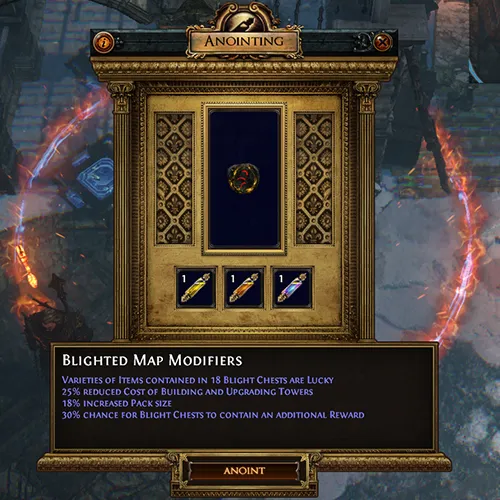
Blighted Maps can be anointed up to three times, but it can be with any combination of Oils you want. Each Oil enchants the map with a different modifier. As a baseline, each Oil grants "+6% increased Pack size". Additionally, each Oil can be applied up to three times, so you could apply three Clear Oils for a total 36% cumulative reduced monster Movement Speed! Here's all of the anointments:
| Clear Oil | 12% reduced monster Movement Speed |
| Sepia Oil | Towers deal 25% more damage |
| Amber Oil | 25% reduced Cost of Building and Upgrading Towers |
| Verdant Oil | 45% increased Experience gain |
| Teal Oil | Blight monster spawn 30% faster and encounter is 50 seconds shorter |
| Azure Oil | Varieties of Items contained in 5 Blight Chests are Lucky* |
| Indigo Oil | Blight encounters contain up to 3 additional Blight bosses |
| Violet Oil | Lanes of Blight encounters have 25% chance for an additional Reward Chest |
| Crimson Oil | Varieties of Items contained in 12 Blight Chests are Lucky* |
| Black Oil | 7% chance for Blight Chests to contain an additional Reward |
| Opalescent Oil | Varieties of Items contained in 18 Blight Chests are Lucky* |
| Silver Oil | 80% increased Quantity of Items found in this Area |
| Golden Oil | 30% chance for Blight Chests to contain an additional Reward |
*When something is "Lucky" in Path of Exile, it means the outcome of it - in this case, opening a chest - is rolled twice. From the two rolls of items it will contain, the one with more valuable items will be chosen, and that's what you'll get!
Now, let's talk Uniques. Blight has six exclusive Unique items that can only drop from Blight encounters, and much like how Abyss Uniques have a special interaction with Abyss Jewels, so do Blight Uniques with anointments! Let's take a look:
| Breathstealer | Cowl of the Ceraunophile |
| The Stampede | Cowl of the Cryophile |
| Sporeguard | Cowl of the Thermophile |
Check out that grey text at the bottom of the item description: This item can be anointed by Cassia. Yup, any of these items can be anointed just like amulets, allowing you to allocate even more Notables from the Passive Tree without having to path to them! Pretty great, right?
Now, before we move on to some popular tower strategies, let's briefly talk about Blight-Ravaged Maps:
- They have a chance to drop from completed Tier 13+ Blighted Maps.
- They can be anointed up to nine times.
- Monsters are slightly more terrifying:
- They have 20% increased Movement Speed.
- They have 200% more life.
They're a lot more rewarding, of course, but like other Pinnacle league content (Simulacrum rounds 21-30, Flawless Breachstones etc.) they'll require a very good build. What's more, these maps are drowning in monsters, and will require so much tower play, that you'll need a pretty good computer to run them if you want to have a decent FPS count. Take care and don't stress your computer too hard!
Depth 5 - Tower Strategies
There's plenty ways to approach Blight content, but the general tips with regards to towers are:
- Make sure you build towers that can stall monsters, to give you more time to kill them.
- Be aware of what types of towers some monsters are resistant to before you build the wrong tower on their lane.
- Complement your build's weaknesses by building appropriate towers, or just slap a Tier IV Imbuing Tower near the Purification Pump and call it a day.
Now, we've prepared some tower combinations below for you. These are generally all-around good combos, but remember they aren't great for every situation! For regular, in-map Blight encounters, keep in mind:
- Their difficulty can vary by quite a lot, depending on how many roots spawn, where they go, and what tower immunities the monsters have. Some roots might even spawn monsters within a few steps from your pump!
- Sometimes, not only are the root lanes awkwardly placed, they're also spawning monsters at an irregular pace, leaving you resource-starved and unable to properly set up all the towers you want.
That said, here's a sort of priority list of which towers will help you most. If you get monsters that are immune to them, pick the next one from the list:
- Empowered Tower + 2x Seismic Towers - this combination will outright stop a lane from advancing. Really shines in Blight encounters with lots of lanes.
- Scout Tower near your pump will do a lot to help you clear out packs.
- Combining this with Seismic and / or Arc Tower will provide a huge boost to the Scout Tower's clearing speed.
- Another combination that works very well in non-Ravaged Blight content are Scout Towers combined with both Freezebolt and Glacial Cage towers. This can be useful in encounters with lots of lanes that are immune to Seismic towers.
Let's take a closer look at one particular strategy, the Empowered + 2x Seismic + Meteor combination. First up, you'll want the following two anoints on your rings:
- Sepia Oil + Azure Oil - Your Empowering Towers have 25% increased effect.
- Indigo Oil + Violet Oil - Your Meteor Towers create Burning Ground for 3 seconds on hit.
Now, just like above, you'll want to combine the Empowered Tower with the two Seismics to fully stun-lock monsters, while the Meteor tower rains hell from above and drops Burning Ground on them. In addition:
- A Scout Tower right next to your pump is useful to pick off any stragglers that sneak through your main death traps.
- Build Empowered + Arc Tower combos on the fringes of your pump area to thin out crowds - especially in choke points where many lanes combine into one.
Note that you can build a whole lot of these combinations several times as long as you have the space and the resources. But, what if something goes wrong? Here's a few contingency plans:
- If your map is juiced and monsters are immune to stun, or have increased Movement Speed, switch out one Seismic Tower with a Glacial Cage Tower.
- Are lots of monsters immune to Seismic Towers? Swap them out for one Chilling Tower and an extra Meteor Tower. Optionally, add an Arc Tower as well, if it fits in the Empowered Tower's area of effect.
- Are lots of monsters immune to Fireball Towers? Instead of the Meteor Tower, build a Chilling Tower and an Arc Tower.
There's countless ways to approach every Blight encounter, and to be really successful, you'll need to have a good idea of what each tower does, what combinations work very well together, and so on. No single Blight encounter, in regular or Blighted Maps, is the same as another. Learning how to adapt to each situation is the key to mastering Blight.
Depth 6 - More Blights & Blight Scarabs
You a fan of tower defense? Looking to get Blighting more often? There's a few ways to go about it:
- Using the Blight map crafting option, which costs 4 Chaos Orbs, will guarantee a Blight encounter in your map.
- Using a Blight Scarab will do the same!
- Allocating certain passive nodes on the Atlas Passive Tree will increase and even guarantee finding Blight encounters on every map. Here are all the nodes that directly incease your chance of finding Blights: LINK. With all of those allocated, your chance to find Blights will be XXX%!
In addition, Blight has 3 more Scarabs that can modify the encounter. Note that these Scarabs do not guarantee a Blight encounter. You'll want to use one of the three strategies above to make sure these Scarabs don't potentially go to waste:
- Blight Scarab of Bounty - More rewards! (maybe). You can use up to 2 of these per map!
- Blight Scarab of Oils - Get those rarer Oils more easily!
- Blight Scarab of Blooming - In exchange for mortal danger, you can break the rules and potentially get a Blight-Ravaged Map to drop outside a Blighted Map!
- Blight Scarab of Invigoration - This can make Blight encounters in map occasionally even more profitable than Blighted Maps!
But what of getting Blight loot in other areas of the game? There's a few possibilities, for those of you who don't want to build towers for a living. Open the box below to check some of them out. Note that non-Blight sources will not award high-end Blight Oils.
- Oils can be found as reward from other league mechanics that can generate the Blight reward type, such as Heist or Expedition.
- They can also be rewarded from Delirium encounters that rolled the Blight reward type, or be guaranteed with the Blighted Delirium Orb.
- Legion monsters may spawn with the Blight reward type as well.
- Blighted maps dropping from other-league reward chests???
Depth 7 - Blighted Atlas Passive Tree
not now, but do make a special mention of the Oil Extractor.
Other Considerations
yass
About_Author

Nox is a senior editor at outof.games, with a 20-year history of playing video games. While you won't find him finally playing GTA V after having bought it many years ago, you may occasionally stumble upon one of his 3000-word essays on the front page.
More_Path of Exile_Guides

A Guide to MARVEL SNAP's Token Shop
Latest_Path of Exile_Guides

// join_the_conversation
Sign in to share your thoughts, vote on comments, and connect with the community.
Comments
// no_comments_found
Be the first to share your thoughts!
Leave a Comment